wiring) in a mild cleaning solvent or mineral spirits. Do not use a harsh cleaning solution. Wipe all parts that cannot be immersed in a solvent with a clean dry cloth.
After foreign deposits have been loosened by soaking, scrub the parts with a soft bristle brush. Do not use a wire brush, file, or other abrasive object. Dry the parts with compressed air.
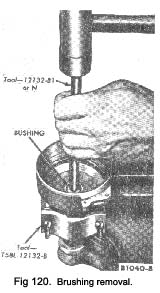
Examine the bushing surface of the distributor shaft and the bushing for wear. On all distributors, the minimum allowable shaft diameter at the bushing is 04675 In. and the maximum allowable inside diameter of the bushing is 04690 in. Replace worn parts.
Inspect the distributor cam lobes for scoring and signs of wear. If any lobe is scored or worn, replace the cam assembly.
Inspect the breaker plate assembly for signs of distortion. In addition, inspect the stationary sub-plate for worn nylon contact buttons. Replace the breaker plate assembly if it is defective.
The breaker point assembly and condens2r should be replaced whenever the distributor is overhauled.
Inspect all electrical wiring for fraying, breaks, etc., and replace any that are not in good condition.
Check the distributor base for cracks or other damage. Check the diaphragm housing, bracket, and rod for damage. Check the vacuum line fitting for stripped threads or other damage. Test the vacuum fittings, case, and diaphragm for leakage. Replace all defective parts.
|
Bench assembly
Original shaft and gear
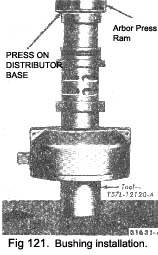
- Oil the new bushing, and position it on the bushing replacer tool. Install the bushing (Fig. 121). When the tool bottoms against the distributor base, the bushing will be installed to the correct depth.
- Burnish the bushing to the proper size (Fig. 122).
- Oil the shaft and slide it into the distributor body.
- Place the collar in position on the shaft and align the holes in the collar and the shaft, then Install a new pin (Fig. 118). Install the distributor cap clamps.
- Check the shaft end play with a feeler gauge placed between the collar and the base of the distributor. If the end play is not within specifications, replace the shaft and gear.
- Attach the distributor shaft supporting tool to the distributor. Tighten the backing screw in the tool enough to remove all shaft end play.
- Install the assembly in a press. Press the gear on the shaft (Fig. 123), using the marks made on the gear and shaft as guides to align the pin holes.
- Remove the distributor from the press. Install the gear retaining pin (Fig. 116).
- Position the distributor in a vice. Fill the grooves in the weight pivot pin with a distributor cam lubricant.
- Position the weights in the distributor.
- Install the weight springs. Be sure the proper weight, spring, and adjustment bracket are as-sembled together
- Install the upper thrust washer.

|
 **
**

