**

Rootes Manual WSM.143/144
Section B (Engine)
1st Re-issue
Page 71


VERY IMPORTANT

The .H.T. leads, especially No. 7, must be positioned in their brack-ets exactly as shown in Fig. 105.
.
If No. 7 H.T. Lead is placed next to No. 8 lead it can induce an H.T. voltage in No. 8 lead when No. 7 spark plug fires. This causes No. 8 plug to fire out of sequence and may DAMAGE THE ENGINE.

IGNITION TIMING
The engine is very sensitive to ignition timing. Incorrect ignition timing will cause any one or more of the following faults.

Bad Idling.
Unsatisfactory performance.
High fuel consumption.
Overheating.
Rough or harsh running.

Distributors have different advance characteristics and it is most important that the correct distributor is used when a replacement unit is fitted. The possibility of a wrong unit having been fitted previously in service must not be overlooked. Full particulars of the dis-tributor are given in the Data Section.

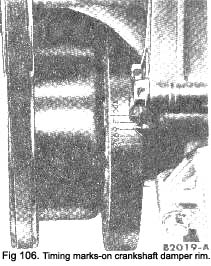
The ignition timing should be checked with a strobos-copic timing lamp with the engine Idling at a speed of 500 r.p.m. The crankshaft damper rim has five timing marks ranging from T.D.C. to 12 deg. B.T.D.C. spaced at 3 deg. intervals. See Fig. 106.

Before checking the ignition timing the contact breaker dwell angle (or gap) should be checked, and if necessary correctly set. This will ensure that the correct Ignition timing is obtained each time the contact points are cleaned and adjusted.


The static ignition setting, contact breaker dwell angle, _ and gap are given In the Data Section under Ignition.

Dwell angle is the period in degrees during which the contact breaker points are closed.

Checking ignition setting

  1. Disconnect the vacuum feed pipe to the distributor at its most convenient end.
  2. Clean and paint the fixed T.D.C. pointer and the static ignition setting before T.D.C. with a thin white line on the crankshaft damper rim. Quick drying white paint should be used.
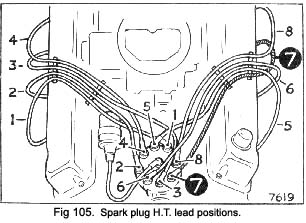
  3. Connect a timing light to number one spark plug. DO NOT PUNCTURE THIS H.T. LEAD. A suitable adaptor MUST be used between the end of the H.T. lead and No. 1 plug lead position in the distributor cap.


Editors Note: Our thanks to Jim Boynton for contributing this page.


  + The Roots of Rootes
  + History of the Tiger
  + Tiger Model Overview
  + Tiger Production
  + People & Pioneers
  + Workshop Manual
  + Factory Race Equipment
  + Literature: Books
  + Articles & Videos
  + Advertising

  + See Rootes Resources


  + History of the Tiger
  + Sunbeam Tiger 2005
  + Early Race History
  + Ken Miles, an appreciation
  + The "Beastie" explained
  + The Playboy Pink Tiger
  + Casting a Light on Lucas
  + LeMans at Goodwood 2002
  + Monterey Historics 2003
  + My Life With Cars

  + See Articles & Humor


  + High Perf. Exhaust
  + Tiger Dash Restoration
  + 350 Lunati Tiger
  + Installing a T5
  + Sound Advice
  + Installing New Carpet
  + The Ackerman Angle
  + "Cool It Buddy"
  + 3 Point Belts
  + Tiger Rotisserie Plans

  + Tiger E-Mail List Archives

  + See Technical Tips


  + Tiger Club Information
  + Events Calendar
  + Service Directory
  + Owner's Gallery
  + Buyer's Guides
  + Contributing Editors
  + Team Tiger Updates
  + Photo Gallery

  + See Online Resources

 
Anyone who would like to contribute to this effort should contact us at Editor E-Mail. Thank you.

Volunteers wishing to join our team are welcome. Take a look at our Contributing Editors
This site has been designed to pool the collective resources of the many great regional and national Sunbeam Tiger clubs. Membership to the these clubs is strongly recommended. Use our Clubs and Organizations Directory to find the organization nearest you and get involved.
**