DISTRIBUTOR TESTING
Preparation for test
- Check the contact dwell. If the contact dwell or the breaker point gap is not within specifications, adjust the breaker points.
- Check the breaker arm spring tension and adjust it if necessary.
The dual advance distributor has two independently operated spark advance systems. Each system is adjusted separately. Adjust the centrifugal advance before adjusting the vacuum advance.
Cam lobe accuracy
Adjust the distributor speed to 1000 r.p.m.
Rotate the degree ring of the tester until the zero on the ring lines up with one of the flashes.
Observe the positions of the remaining flashes. If the flashes are not evenly spaced (within ± 10), check for a worn cam, worn distributor shaft or a bent distributor shaft.
Centrifugal advance
- Do not connect the test set vacuum line to the diaphragm. Set the test set to 0 deg. advance and the initial r.p.m. setting listed in the Data Section under “Ignition”.
- Operate the distributor in the direction of rotation (counterclockwise) and slowly increase the r.p.m. to the setting specified for the first advance reading listed in the specifications.
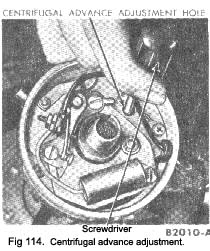
If the correct advance is not indicated at this r.p.m., stop the distributor and bend one spring adjustment bracket to change its tension. (Fig. 114). Bend the
|
adjustment bracket away from the distributor shaft to decrease advance (increase spring tension) and toward the shaft to increase advance (decrease spring tension). After the adjustment is made, identify the bracket.
3. After an adjustment has been made to one spring, check the minimum advance point again.
4. Operate the distributor at the specified r.p.m. to give an advance just below the maximum. If this advance is not to specifications, stop the distributor and bend the other spring bracket to give the correct advance.
5. Check the advance at all r.p.m. settings given in the Data Section under “Ignition”. Operate the distri-butor both up and down the r.p.m. range.
Vacuum advance
- Connect the test set vacuum line to the fittings on the diaphragm.
- Set the test set to 0 deg. advance, 0 vacuum, and at 1000 r.p.m.
- Check the advance at the first vacuum setting given in the specifications.
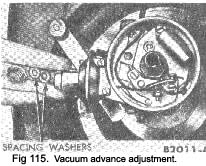
- If the advance is incorrect, change the calibration washers between the vacuum chamber spring and nut (Fig. 115). After installing or removing the washers, position the gasket and tighten the nut.
The addition of a washer will decrease the advance and the removal of a washer will increase the advance.
- After one vacuum setting has been adjusted, the others should be checked. Do not change the original r.p.m. setting when going to a different vacuum setting. If the other settings are not within limits, it indicates incorrect spring tension, leakage in the vacuum chamber and/or line, or the wrong fibre stop has been installed in the vacuum chamber of the diaphragm housing.
|
 **
**

