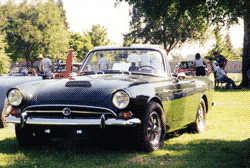
Cool It, Buddy!
An Article by
Sept., 2001
Page 1
The Problem:
The Tiger cooling system requires that the heat generated by the engine be transferred to the cooling medium (water/additives), which in turn transfers this heat to the air flowing through the radiator. In the automotive design, it would transfer the most heat by having more air flowing through the radiator, and more radiator surface in contact with the air to transfer the heat.
The radiator heat transfer efficiency, at a constant water flow rate, depends on the exposed surface area. This area consists of the coolant tubes, themselves, and the bonded fins. The fins and tubes transfer the heat to the air flowing by their hot surfaces.
Problems can arise if there is insufficient flow rate of the cooling medium, insufficient transfer of the combustion gas heat into the cooling medium, insufficient radiator surface area, or insufficient air flow.
My personal attention to this issue, having experienced an embarrassing leakage of neon green liquid on a friends pristine concrete driveway, involved every aspect of the cooling system but modifications to the stock water pump. The extent of the overheating was severe enough that this overflow would occur on 85 Deg. F. days in neighborhood driving conditions. The temperature indicator would verify that the needle was at the high end of the dial. There was NO doubt that my problem was not a gauge problem.
The solution was attacked on many fronts, and the results were most satisfactory. I'll go through each modification to describe the improvements made.
The Radiator
 The original radiator was a three row design, probably replaced at some point in the 45,000 miles on the engine with a "higher efficiency" design of the 70's. Since that time, even better designs were made, and available. I chose a Modine core, that was only available on special order, as recommended by the radiator shop. It was a 4 row design, with a high fin density, and yet was no thicker than the three row, so it was the same size as the stock core, and fit the stock end tanks.
Modine Special Order Manufacturing Division (ONLY) "Special High Efficiency Core" Cross flow. 18 1/2 W x 15 1/2 H (stock). Four parallel rows of 5/16 tubes on 3/8 centers, 36 tubes/row, each 3/8 inch deep by 0.080 wide externally. 14 fins/per inch fin density.
This radiator costs about $300, built by Simi Valley local radiator shop, and well worth it. Uses stock tanks, and fits stock shroud. The source (who will ship) is Commercial Radiator Service, 864 Los Angeles Avenue, Simi Valley, CA 93065 (805-527-3332) (FAX 805-520-1148) B.A.R. #AG029137 (California Bureau of Automotive Repair shop number) . He calls it a Special High Efficiency Core. Ask for "Ken"
The Electric Fan
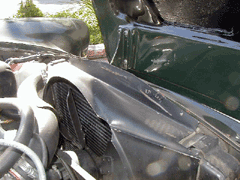
 From the advice provided by Bob Palmer, I purchased a High efficiency pusher fan, mounted in front of radiator, shroud sealed to radiator with Home Depot sticky-back thick rubber foam. This tape is also available in 1/4 inch width for sealing any gaps in the regular fan shroud, as well.You do not want any electric fan mounted to the radiator with tie-wraps, clamp posts, or anything else that vibration can rub against the core. The fan is mounted on a short aluminum "L" that is bolted to the radiator support structure. The upper end is pop-rivited to the inner body shell that contains the hood hinge body end. How I got the 2 holes for the pop rivets (bolt heads are too high) that meet the treaded holes of the fan ring support I do not know. Lucky, I guess.
The fan is a 13" pusher type, 1600 CFM and I ordered it by phone (credit cards accepted) from Quest Cooling. 13" is the size that fits. It comes with the "Terminator" motor and is the maximum size I could get to mount flush with the radiator, and fit the space. For information, call 800-272-FANS (3267) and talk with Gary. You can also write for info catalog to Quest Cooling 25520 Avenue Stanford, Unit 304 Valencia, CA 91355.
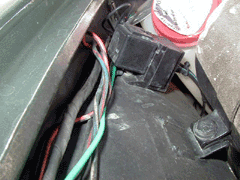 It comes with relay, fuse and switch. I ordered the new plug-in plastic fuses with the mount screwed to the body. I also used a body mounted holder for the plug-in cube style relay. These are carried by many electronics stores, or automotive premium sound installers. Quest may have them too. I used a Lucas SPST like Tiger normal stock switch, and mounted it where the "mechanical choke" never was. Some back side wood trimming is necessary to clear the body of the switch. When it gets too hot, I turn it on. When it gets OK and will run stably, I shut it off. One more automatic switch/sensor not to cause damage by rubbing on the fins/tubes, or fail.
 I only use this fan when the temperature is climbing above it's normal operating range of 190-200 Deg. F. as I know it doesn't stop at some stable higher level. This will only occur in 105 Deg/ F. weather, while going up a freeway long hill in bumper-to-bumper stop and go traffic. In other words the normal San Diego Freeway over the pass to the Valley. I watch the needle start to climb at a steady pace, throw on the switch, and watch it back right down. Over the top, in faster traffic, and the switch is shut off. Neither the electric fan, nor the 6 bladed fan following, have much benefit over 35 mph in any event. If your car runs hot then, it is NOT these components. They are a mild breeze compared to the velocity of the air stream. The valance guide, described later, however, is the most important piece under these conditions.
The Water Pump Fan
 I found an Early Ford 6 blade fan (C4DE-8600-A), brand new in original box at the local Ford Agency - and got a 25% "Mustang Club" discount!.With the modification to a 1" center hole and end mill trimmed blades (about 1/2 inch) on a vertical milling machine, it fits fine. Watch that you still have those original motor washer-spacers between the block and the motor mounts to raise the engine to it's original height, and center the fan in the shroud. Make sure you leave them there, or your rack will "re-form" the fan to fit! (with sound effects you will not enjoy (BTDT)
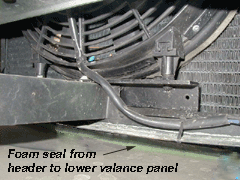
The Stock Shroud
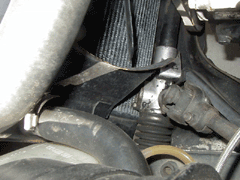 Aside from the edge selaing foam tape, mentioned previously, you should consider putting a small, removable, bridge of aluminum sheet between the bottom ends of the shroud to complete the shroud and increase efficiency. Although I have yet to make this piece, the gap and to be filled is pictured along with the rack and pinion. The fan should be 2/3 submerged and 1/3 behind the shroud, if it is set up right. The bottom gap allows air to escape the tunneling effect of the shroud. Shapping some light guage aluminum between the narrow bottom ends to fill the gap and seal near the rack (more doulbe sticky, or great care to avoid getting between the rack and the fan blades. Don't worry if you don't quite make this, the fan will take care of it in short order, and you can try again. Do not let the chosen removable fastners either be unreachable, or get in the pathc of moving objects - or you can replace them again, along with the fan.
 **
**