8. Disconnect the water temperature sending unit wire at the sending unit.
9. Disconnect the crankcase vent hose from the car-burettor spacer. Remove the intake, manifold and carburettor as an assembly. Remove the intake manifold gaskets and seals.
10. Remove the crankcase ventilation regulator valve from the valve rocker arm cover. Remove the valve rocker arm covers. Loosen the valve rocker arm stud nuts and rotate the rocker arms to the side.
11. Remove the valve push rods in sequence so that they can be installed in their original positions.
12. Using a magnet, remove the valve lifters and place them in a rack so that they can be installed in their original bores (Fig. 51).
If the valve lifters are stuck in their bores by exces-sive varnish, etc., it may be necessary to use a plier-type tool (TS2T-6500-DJD or 6500-D) to remove the lifters. Rotate the’ lifter back and forth to loosen it from the gum or varnish that may have formed at the lifter.
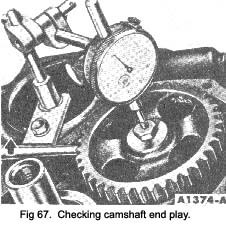
13. Check camshaft end, float.
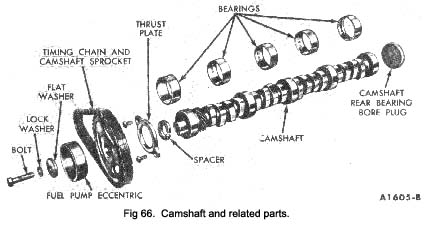
14. Remove the camshaft thrust plate. Carefully remove the camshaft by pulling it toward the front of the engine. Use caution to avoid damaging the camshaft bearings.
|
Camshaft end play
Push the camshaft toward the rear of the engine. Install a dial indicator so that the Indicator point is on the cam-shaft sprocket cap screw (Fig. 67). Zero the dial indicator. Position a large screwdriver between the camshaft sprocket and the block. Pull the camshaft forward and release It. Compare the dial indicator reading with the figures given In the Data Section under “Camshaft”. If the end play is excessive, replace the thrust plate. Remove the dial indicator.
|
 **
**

