|
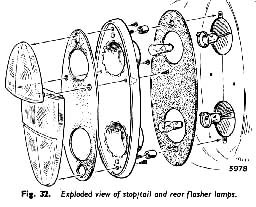
STOP/TAIL AND REAR FLASHER LAMPS
To renew the bulbs, pull the clip type bulb holder from the rear of the lamp unit (in the luggage com-partment).
To remove the lamp units, remove the two securing
screws from the rear of the unit. The lenses may be removed after removal of the tamp unit by unscrewing the four cross-headed screws. When re-assembling, ensure that the rubber gaskets are correctly positioned (see Fig. 32).
REAR NUMBER PLATE ILLUMINATING LAMP
Release the dome-shaped glass by sliding the retaining clip to one side. Take off the glass and renew the bulb. Refit the glass and move the retaining clip into position.
|
STOP LAMP SWITCH UNIT
The stop lamps are automatically controlled by a hydraulically operated switch incorporated in the brake fluid pipe line.
The switch is accessible when the bonnet is raised. It is located in the branch union which is forward of the brake master cylinder.
INSTRUMENT PANEL AND WARNING LAMPS
The bulbholders are a push fit in the backs of the instru-ments and access is obtained from behind the facia panel. To remove a warning lamp bulb holder, push out the holder from the rear of the facia.
MAP LIGHT
Immediately above the cubby box is a map light, the switch for its operation being positioned at one end of the body. Renewal of the festoon type bulb is occasioned by detaching the lens from the two brass retaining pegs by simply pulling the lens from the body.
INTERIOR LAMP (Alpine 260 G.T.)
Firmly press one side of the plastic lamp cover inwards so that the retaining flanges of the cover are clear of the slots in the lamp housing and take away the cover. Renew the bulb.
When refitting the cover, first enter the flanges in the slots on one side and then press it into position.
|
 **
**
