|
FRONT ROAD SPRING (Fig. 12)
To remove
When removing or refitting the front road spring, it will be necessary to compress the spring to detach the bottom wishbone link from the front suspension cross member. A special tool is available for this purpose (see Section 5), the use of a jack, as an alternative is not recommended.
1. Remove the shock absorber, see under “Shock Absorber — To remove and refit”.
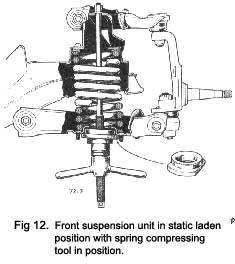
2. Fit the spring compressor In place of the shock absorber and compress the road spring, the spring should be compressed until the bottom link Is In the horizontal position. This relieves the tension on the swivel bearings and fulcrum pin attachment bolts.
A spring compressor is shown with the suspension unit in the static laden position in Fig. 12.
3. Detach the lower swivel bearing from the stub axle carrier by discarding the split pin, removing the castellated nut and withdrawing the tapered ball pin using a suitable extractor.
4. Support the top wishbone link and front hub assembly by positioning a small block of wood between the rebound rubber and the side of the spring turret.
5. Withdraw the four bolts and washers securing the lower fulcrum pin to the crossmember.
6. Release the spring compressor gradually until the roadspring is fully extended, remove the spring com-pressor, lower wishbone link, road spring and Insulator.
|
7. Refitting is the reverse of the removal sequence but particular attention must be given to the following:
(I) The road spring is fed into the spring turret with the insulator on its upper end.
(ii) The nut of the swivel bearing and four fulcrum pin bolts are tightened to the torque given in the “General Data Section”.
BOTTOM WISHBONE LINK
To remove and refit
The bottom wishbone link is removed and refitted in a similar manner to that described under “Front Road Spring — To remove and refit”. When a new replace-ment bottom wishbone link is fitted the two nuts on the ends of the fulcrum pin must only be tightened when the weight of the car is on the road wheels and a full front suspension check is carried out.
|
 **
**