Gear shift linkage adjustment
Set the gear shift lever in the neutral position
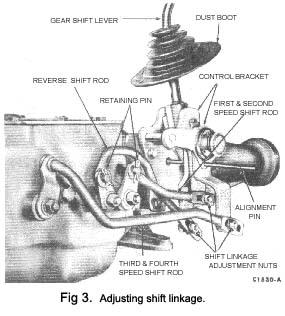
1. Loosen the three shift linkage adjustment nuts. Install a 1/4 in. diameter alignment pin through the control bracket and levers, as shown in Fig. 3. Access may be gained through a detachable panel on the tunnel, inside the car.
2. Tighten the three linkage adjustment nuts and then remove the alignment pin.
3. Check the gear shift lever for a smooth crossover.
 Removal
The engine and gearbox must be removed as a complete unit (See Section B). With the unit removed from the car, detach the gearbox from the engine by removing the bolts that secure the gearbox, and withdraw the input shaft from the flywheel housing.
Do not depress the clutch pedal while the gearbox is removed.
Editor’s Note: Don’t believe it. The gearbox or the engine can be removed separately, and often much easier. See TigersUnited Forum, Workshop Manual Subjects, under both Section B – Engine, as well as Section E – Gearbox.
|
Installation
To fit gearbox to engine
1. Make sure that the mounting surfaces of the gear-box and the flywheel housing are free of dirt. paint and burrs.
Install two guide pins in the flywheel housing lower mounting bolt holes. Move the gearbox forward on the guide pins until the input shaft splines enter the clutch hub splines and the case is positioned against the flywheel housing.
2. Install the two upper mounting bolts snug and then remove the two guide pins. Install the two lower mounting bolts.
Torque all bolts to specification.
With the gearbox and engine installed
3. Slide the forward end of the propeller shaft assembly over the output shaft.
Connect the propeller shaft to the rear U-joint flange.
4. Place both the forward gear shift levers and the reverse shift lever in the neutral position and insert a ~ in. diameter alignment pin in the shift linkage adjustment holes. It may be necessary to loosen the adjustment nuts to install the alignment pin. Adjust the linkage as necessary and tighten the adjustment nuts to specifications. Remove the alignment pin.
5. Fill the gearbox to the proper level with the specified lubricant.
6. Lower the car and install the shift selector lever and boot.
7. Check the shift and cross-over motion for full shift engagement and smooth cross-over operation.
To DISMANTLE
1. Mount the gearbox in a holding fixture and drain the lubricant.
2. Remove the retaining clip, flat washer and spring
washer that secures the shift rods to the shift levers.
3. Remove the shift linkage control bracket attaching screws and remove the shift linkage and the control bracket.
4. Remove the cover attaching screws from the case. Lift the cover and gasket from the case.
5. Remove the extension housing attaching screws and lock washers. Remove the housing and the gasket.
6. Remove the input shaft bearing retainer attaching screws. Slide the retainer off the Input shaft.
|
 **
**