17. Coat the coned surface of the 2nd speed gear with grease and position the blocking ring on the gear.
18. Slide the lst/2nd speed synchronizer on to the rear of the output shaft, making sure that the inserts engage the notches in the blocking ring, and that the shift fork groove is towards the rear of the shaft.
19. Coat the coned surface of the 1st speed gear with grease, and position the blocking ring on it.
20. Slide the 1st speed gear on to the rear of the output shaft, making sure that the notches in ~he blocking ring engage the synchronizer inserts.
21. Install the heavy thrust washer on the rear of the output shaft.
22. Carefully lower the output shaft assembly into the case as shown in Fig. 8.
23. Position the lst/2nd speed shift fork and the 3rd/4th speed shift fork in place on their respective gears and rotate them into place.
24. Place the detent plug (Fig, 5) in the detent bore. Place the reverse shift rail into the neutral position.
25. Coat the 3rd/4th speed shift rail interlock pin with grease and position it in the shift rail.
26. Align the 3rd/4th speed shift fork with the shift rail bores and slide the shift rail Into place, making sure that the three detents are facing towards the outside of the case. Place the front synchronizer into 3rd speed position and Install the setscrew in the 3rd/4th speed shift fork. Move the synchronizer to the neutral position. Install the 3rd/4th speed shift rail detent plug, spring and bolt in the left side of the gearbox case (Fig. 5).
Place the interlock plug (tapered ends) In the detent bore.
27. Align the lstI2d speed shift fork with the case bores, and slide the shift rail into place.
Secure the fork with the set screw.
install a detent plug and spring in the detent bore. Thread the set screw into the case until the head is flush with the case.
28. Coat the input gear bore with just enough grease to hold the roller bearings in place, then Install the 15 roller bearings.
29. Place the Input shaft gear in the gearbox case making sure that the output shaft pilot enters the roller bearings in the Input gear.
30. Place a new gasket on the input shaft bearing retainer. Dip the attaching bolts in sealer and install and tighten them to specifications.
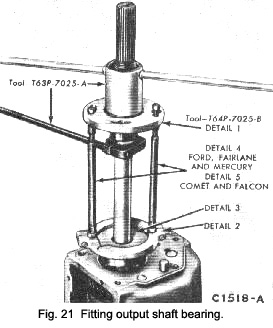
31. Install the output shaft bearing as shown in Fig. 21. install the snap ring to retain the bearing.
|
32. Position the speedometer gear drive ball in the output shaft and slide the gear into place. Secure the gear with the snap ring.
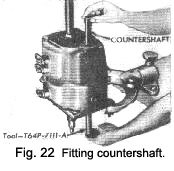
33. Place the gearbox in a vertical position as shown in Fig. 22. Align the countershaft gear bore and thrust washers with the bore in the case. Install the countershaft.
34. Use a new gasket and. secure the extension housing to the case with the attaching screws. Use a sealer on the extension housing attaching screws. Torque the screws to specifications.
35. Install the filler and drain plugs if they were removed. Make sure that the magnetic plug Is Installed In the bottom of the case.
|
 **
**