**

Rootes Manual WSM.143/144
Section C (Fuel System)
Page 27


4. Look for bubble formations in the water in the bowl. A continuous stream of bubbles indicates leakage through the power valve diaphragm or gasket, or the cover or gasket.

If leakage is encountered, the power valve, power valve gasket, the cover, and cover gasket should be replaced one at a time with a new part and the test repeated until the source of leakage has been found. If the source of leakage cannot be found, the gasket seats are damaged and the defective parts should be replaced.

A few bubbles may be noticed immediately upon attaching the vacuum line. The bubbling should stop within approximately 15 seconds or after the air has been re-moved from the system. If no bubbles are seen, the power valve, gaskets and cover are seating properly.


AIR CLEANER
To remove and replace filter element
1. Detach the rubber pipe from the underside of the bottom plate. Remove the centre nut and washer which retains the air cleaner assembly to the carburettor and take off the air cleaner. The air cleaner MUST be removed from the carburettor as an assembly to avoid the possibility of any dust entering the carburettor intake as the air cleaner is dismantled.

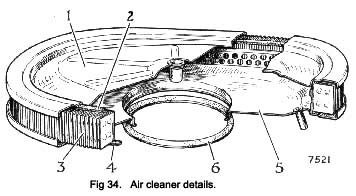
2. With the assembly on a bench, lift off the top plate (1) taking care that its joint ring (2) is not damaged, and lift off filter element (3).

3. Before fitting a new filter element, or refitting the clean original filter element, both the top (1) and
bottom plates (5) should be wiped clean of all dust. Take care that the joint ring (6) between the bottom plate and the carburettor is in good con-dition.

4. Place one of the joint rings (4) on the bottom plate, then the filter element (3), the second joint ring (2), and finally the top plate (1).

5. With the assembly clamped between the fingers, refit the air cleaner assembly to the carburettor, securing with the centre nut and washer. Re-attach the rubber pipe to the underside of the bottom plate.

NOTE: The filter element MUST NOT be cleaned by washing, nor does it require oiling.


WSM SECTION C C 1 C 2 C 3 C 4 C 5 C 6 C 7 C 8 C 9 C 10 C 11 C 12 C 13 C 14
FUEL SYSTEM C 15 C 16 C 17 C 18 C 19 C 20 C 21 C 22 C 23 C 24 C 25 C 26 C 27


  + The Roots of Rootes
  + History of the Tiger
  + Tiger Model Overview
  + Tiger Production
  + People & Pioneers
  + Workshop Manual
  + Factory Race Equipment
  + Literature: Books
  + Articles & Videos
  + Advertising

  + See Rootes Resources


  + History of the Tiger
  + Sunbeam Tiger 2005
  + Early Race History
  + Ken Miles, an appreciation
  + The "Beastie" explained
  + The Playboy Pink Tiger
  + Casting a Light on Lucas
  + LeMans at Goodwood 2002
  + Monterey Historics 2003
  + My Life With Cars

  + See Articles & Humor


  + High Perf. Exhaust
  + Tiger Dash Restoration
  + 350 Lunati Tiger
  + Installing a T5
  + Sound Advice
  + Installing New Carpet
  + The Ackerman Angle
  + "Cool It Buddy"
  + 3 Point Belts
  + Tiger Rotisserie Plans

  + Tiger E-Mail List Archives

  + See Technical Tips


  + Tiger Club Information
  + Events Calendar
  + Service Directory
  + Owner's Gallery
  + Buyer's Guides
  + Contributing Editors
  + Team Tiger Updates
  + Photo Gallery

  + See Online Resources

 
Anyone who would like to contribute to this effort should contact us at Editor E-Mail. Thank you.

Volunteers wishing to join our team are welcome. Take a look at our Contributing Editors
This site has been designed to pool the collective resources of the many great regional and national Sunbeam Tiger clubs. Membership to the these clubs is strongly recommended. Use our Clubs and Organizations Directory to find the organization nearest you and get involved.
**