MAJOR REPAIR OPERATIONS
Dismantling
To facilitate working on the carburettor, and to prevent damage to the throttle plates, install carburettor legs on the base if legs are unavailable, install four bolts
about 2 1/4 in. long of the correct diameter and nuts on the carburettor base.
Use a separate container for the component parts of the various assemblies to facilitate cleaning, Inspection and assembly.
The following is a step-by-step sequence of operations for completely overhauling the carburettor. However, certain components of the carburettor may be serviced without a complete disassembly of an entire unit. For a complete carburettor overhaul, follow all of the steps. To partially overhaul either carburettor or to install a new gasket kit, follow only the applicable steps.
Refer to Fig. 32 on page 25 for parts identification.
|
Air horn
1. Remove the air cleaner anchor screw.
2. Remove the automatic choke control rod retainer.
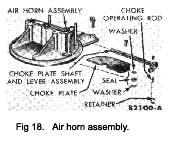
3. Remove the air horn retaining screws, lock washers and the carburettor identification tag. Remove the air horn and air horn gasket (Fig. 18).
4. Remove the choke control rod by loosening and turning the choke shaft lever clevis nut counter-clockwise. Remove the rod from the air horn. Slide the felt seal and two washers out of the air horn.
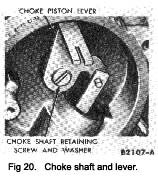
If it is necessary to remove the choke plate, remove the staking marks on the choke plate retaining screws and remove the screws. Remove the choke plate by sliding it out of the shaft from the top of the air horn. Slide the choke shaft out of the air horn.
If the tips of the screws are flared excessively, file off the flared portion to prevent damage to the threads in the shaft.
|
 **
**


