7. Drop the accelerating pump inlet ball check into the inlet passage of the accelerating pump chamber (Fig. 26). Seat the bail with a brass drift and a light hammer. Make sure the ball is free in the bore. Install the cavity filler in the pump chamber. Install the retaining screw and washer.
8. Install the accelerating pump diaphragm return spring on the boss on the chamber (Fig. 26). Insert the diaphragm assembly in the cover and place the cover and diaphragm assembly in position on the main body. Install the cover screws.
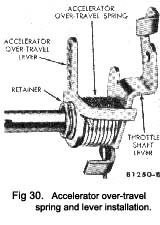
9. Insert the accelerating pump operating rod into the inboard hole of the accelerating pump actuating lever. Position the accelerating pump operating rod retainer over the specified hole in the over-travel lever to suit the operating, and the climatic con-ditions under which the car is to be operated. (See under Carburettor in the Data section). Press the ends of the retainer together; then, at the same time, insert the operating rod through the retainer and the hole in the over-travel lever. Release the ends of the retainer to secure the rod.
10. Invert the main body. Install the power valve (economizer valve) and new gasket with a wrench (Fig. 27). Tighten the valve securely. Install the power valve cover and gasket.
11. Install the idle mixture adjusting screws (needles) and springs (Fig. 13). Turn the needles in gently
|
with the fingers until they just touch the seat, then back them off 1-1 1/2 turns for a preliminary idle fuel mixture adjustment.
12. Install the main jets and the fuel inlet seat and new gasket, using a jet wrench (Figs. 23 and 24). Be sure the correct jets are installed.
13. Position the float shaft retainer in the groove on the fuel inlet needle seat. Install the fuel inlet needle assembly in the fuel inlet seat. The fuel inlet needle and seat are matched assemblies. Be sure the correct needle and seat are assembled together.
14. Slide the float shaft into the float lever (Fig. 21). Install the torsion (damper) spring on the float shaft and insert the short end of the spring under the flange of the float lever.
15. Insert the float assembly into the fuel bowl and hook the float tab under the fuel inlet needle assembly. Insert the float shaft into its guides at the sides of the fuel bowl. Allow the long end of the damper spring to rest against the wall of the fuel bowl.
16. Use a hook to position the shaft retainer in the grooves on the shaft (Fig. 22). Refer to “Adjust-ments” and check the float setting.
17. Drop the accelerating pump discharge bail into its passage in the main body. Seat the ball with a brass drift and a light hammer. Make sure the ball is free in the bore. Drop the accelerating pump discharge weight on top of the bail. Position the
|
 **
**