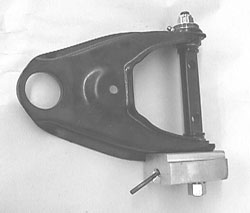
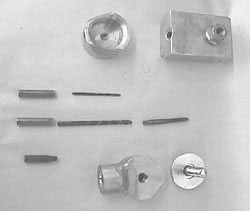
Unfortunately, the Tiger A-Arms are not easily fixtured and held for modifications on a drill press or milling machine. The drill fixtures depicted herein are made to bolt directly to the A-Arms and allow the use of a hand held electric drill. These fixtures allow drilling, threading and fitting installations at the optimum locations without machine tool requirements. They are used once after disassembly and cleaning to drill and tap the holes for the grease fittings and again after welding, painting and bushing installation and assembly to drill and complete the “path” which allows the grease to reach the inside rotational surface.
The first step in the rebuilding process is to remove the old bushings and fulcrum pins. All of this suspension repair work requires specialized tooling including custom fixturing, hydraulic press, lathe and preferably blast cleaning equipment. Care must be taken to minimize the distortion of the A-Arms during disassembly. Long term degradation and rust make this process difficult and it is not something to attempt at home if you don’t have access to the proper equipment. Even with proper equipment, it is not unlikely that you will deform some of the components, such as the beveled thrust washers on the fulcrum pins thus requiring repair or replacement. This Tip is not intended to be a step-by-step procedure for bushing removal and installation but rather an overview and recommendations which will allow you to understand the process.
Another topic which must be considered at this point are the controversial lower fulcrum pins. It has been pretty well established that Tigers that have seen a lot of high performance time (High performance engines, Autocrossing, etc.) have tended to be harder on these highly stressed components than un-raced stockers and Alpines. Breakage of these pins is not uncommon but almost always happens at low speeds and when backing up. If you are going to pursue high performance activities, or simply want to decrease your chances for fulcrum pin failure, Doug Jennings of Tiger Auto (937 252-3317) in Dayton, Ohio has the only available “stock configuration” fulcrum pin replacements. There are no guarantees against breakage, but the prototype bushing set you see here was assembled with Doug’s pins, just to be on the safe side.
With the components appropriately separated, It’s time for cleanup and assembly preparation. I like mechanical preparation such as abrasive blasting to remove all traces of rust and prepare the surfaces for paint. Chemical stripping can be used but I prefer not to use harsh chemicals in areas where unknown metallurgical conditions exist. I typically chase all the threads and protect them with vinyl tape prior to blast cleaning.
Protective painting can be applied by any of several methods. I prefer Urethane coatings for cost effectiveness, but the powder coating process may also allow some level of thermal annealing of built up structural stresses.
|
|
|
|
|
 |
|
Figure 4. Here’s the drill fixture mounted on the upper A-Arm with the #3 tap drill protruding. Note that this modification would normally be done before bushing installation |
It is appropriate to measure the inside bore diameter of the A-Arm bushing tubes and the outside diameter of the new urethane bushing shells. While there is a range of allowable interference it should not exceed 0.010" or you may end up perminently deforming the bushing shells before they are fully installed. It is also advisable to grind a small (.03") chamfer on the leading edge of the external steel bushing shell. This will allow a better “slip” into the A-Arm bore. This press fit can also be aided by the use of a small amount of grease unless the interference “fit” is very small..
 **
**

