The Restoration of PRRROWL
TIGER # B382000221
An Article by John Crawley
March, 2001
Page 19
SOFT TOP
Soft Top Installation
For those of you that have great manual dexterity lots of patience and are truly crazy do-it-your-selfers I include this method of top installation. For those of you that are not so inclined I include the same instructions at no extra cost. You may, however, wish to supply these to the upholstery shop that you choose to install your top. If you do this be sure to tell them to read the steps numbers 16 and 24, as this is were the TIGER top is different than any other installation. I do not profess to be a qualified upholsterer but I do have some knowledge, as my sister owns an upholstery shop. She did not help with this installation but I did use the principals that she taught me. I installed a Robins top purchased from CAT.
This may or may not be the correct way to install Tiger "weather equipment" but it did work for me. YOU TAKE YOUR CHANCES TO FOLLOW THIS!
Sandblast and paint the top-bows or finish them by industrial plating before you start. Read all of this before you start and walk your way through as a practice as you read.
- Adjust the windscreen angle then adjust the vertical top bow posts to fit the wound up side windows. This fit should be front-to-back and side-to-side. (see other tips in this site)
- Adjust the tension rods. (See following)
- Adjust the Top-bow webbing (see following)
- Ensure that the top-bow pivots (on the top of the B posts) are adjusted and function perfectly. They should just click into place on both sides when the top bows are raised. The adjustments to this point are the most difficult part of fitting a top. Even if you are taking your TIGER to an upholsterer to have the top fitted these adjustments should be done first.
- Place the new top over the top-bows. Align the front cross seam over the non-folding, front top-bow. The rear cross seam should line up over the rear, folding, top-bow if the top-bow web is correctly fitted.
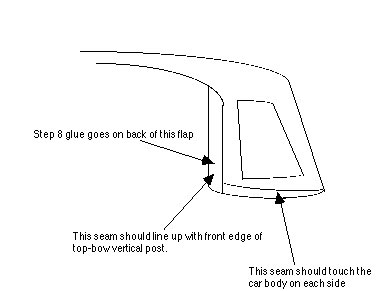
- The vertical seam at the rear of the side window openings should line up with the vertical post of the top bow. The seam at the bottom of the top should touch the body of the car on both sides at this point. If not, center the top.
- Replace the Velcro on the top bow stays if required. Use bookbinder’s tape or duct tape to hold the top on to the Velcro (Remember Velcro sticks best if it is rubbed down several times). Do not leave this tape on for more than a few hours or the glue may mark the top
- Tape the soft-top-to-windscreen rubber to the peal rail. Now tape the top to the top chrome of the windscreen surround.
- Use GEL TYPE contact cement on the top-bow uprights and then on the top to glue the vertical seam to the upright. GEL contact cement will not melt the plastic that the top is made of. It also will not string out and get all over everything and it will clean off. Let both sides dry and then make contact. Do not bunch holes for the screws that hold this area on to the top bows at this time. It is essential, though, that the top be tight from side to side, over the top bows.
- Brush contact cement on the rear cockpit cowling and on the rubber edging that finishes the cockpit. Attach the edging to the car after both surfaces are dry. If the rubber trim is new use a white marker on the rubber to pin point the screw holes in the rear cowling metal. If you are re-using the rubber, line the screw holes up with the screw holes in the metal. You may now put a screw in each end of the rear trim, pulling gently outward from center on each side.
- From inside the car pull the rear of the top back - at the center (not too hard, as it is better to be loose than too tight). Locate the center hole in the aluminum trim and screw through it and the top into the center screw hole in the rear cowl. This is the first hole that you will put into the new top and your stomach will tie into notes here.
- Check that the top fits correctly at the back. The flap that contains the snap and the "Lift-a-dot" must fit flat on to the car body. The rear edge of this flap, where it is sewn to the top, should just meet the car body.
- Check the fit over the crossbows. It should be tight. Install the lift-a-dot on each side now. The "dot" should point towards you when you stand facing the side of the car.
- Install the rear snap pulling gently back on the flap against the lift-a-dot. If your top is properly installed you will not have to pull down only back.
- Now go back to the inside back and begin working from the center outward on alternate sides, screwing the rear trim to the body. As you do this bull gently down and away from center. Remember that you are only pulling against the binder’s tape at the front. You may pull harder towards the sides, as this must be a good fit for the top to be tight. Check the outside fit as you put in each screw. Be sure to see that your tape has not pulled free at the front. You do not want wrinkles to develop either.
- DO NOT screw the inside shorter side trim on at this time.
- Now work on the front leading edge. Pull the top tight and re-tape working from the center outward to each side. Run long pieces of tape from the top down to the windscreen. Now mark the top with masking tape were it crosses the leading edge of the peak rail. Also mark the center of the top with masking tape and with a second piece of tape mark the center of the peak rail. You will have to remove some of the binder’s tape to do this.
- Now unsnap the top clamps that hold the peak rail to the windscreen. Remove all the binders tape and fold the tension rods upwards. At this point you may want to tape the side stays into their retaining pins so that the whole thing does not collapse on you. Spread GEL TYPE contact cement on the underside leading edge of the peak rail and on the front 1 inch of the underside of the top. Be sure to cover the top with paper before you do this so that you do not get any glue on it. Let this dry. Now attach the top to the peak rail starting at the point that you marked as center. The masking tape that you marked the leading edge of the peak rail should just roll under the peak rail leading edge. Press the glued top edge into place working from the center outwards and pulling tight as you go. Be sure to work the top well up into the under side curve of the peal rail.
- You may now snap the peak rail back onto the windscreen. The top should at this point be a snug fit will no wrinkles nor loose spots. You may adjust the fit at the front by repeating step 16.
- Adjust the fit at the side by repeating step 8. The screw and trim may now be installed on the uprights.
- The back fit may be adjusted by removing the rear trim screws and pulling downwards and from side to side in order to take up any slack or to eliminate any wrinkles. Remember I said in #10 that it is better to be slack here than to be too tight. NOW is the time to take up the slack. Any holes previously punched in the back edge will be lower than the new holes and will not cause a problem. You may find that all fits well and no further adjustment is necessary. I mostly give this caution so that you do not pull too hard in step #10 and pull the top out of position.
- At this point you can now let the work rest a while. Let the car get cold in the evening. Let the sun shine on it. Drive it a bit. I put 300 miles on my Tiger in blinding rain and the front glue held but I do not recommend this as a test.
- Once you are sure of the fit remove the rubber that you taped on to the windscreen and install it and the rubber onto the bottom side of the peakrail.
- Now all that remains is to secure the short side trim to the rubber trim that finishes the cockpit. This trim does not hold the top. It holds only the rubber in place. Remember that the top in this area must be slack for the top to fold down when it is finished. This piece of the top that hangs down is simply held to the edge if the inside drip tray that is over the rear wheel well by a clip. The clips resemble a small "alligator" paper clip with the silver handles removed which may be used if the originals are missing.
- After the top has been installed for a period of time any small wrinkles may be taken out by using a steaming kettle on the inside of the wrinkle. Be careful as the steam can easily shrink the top too much.
Top Bows
The top bows of a Tiger are strange things indeed. Their stability depends upon two blocks of plastic holding two thin rods from moving laterally. The two rods are called tension rods. They pivot upwards from the top rails and insert into the "Peak rail" (That part of the top that clamps on to the windscreen).
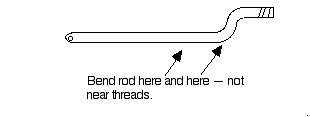
These tension rods can be a real pain. As they are part of the "weather equipment" they are prone to rust. If you have a set that are free of rust and the adjustments are able to move with no trouble you are home free but most that I have seen have long ago given up the ability to move. They have very narrow threaded ends on them and are easily broken when you try to make the tension adjustment. Once broken they are expensive and difficult to repair so treat them with care.
Tip: Rather than adjust them with the screw ends bent the rod body a bit. A small bend in this area will enable the end of the tension rod to be at the correct angle to the hole in the peak rail. This angle is a more critical adjustment then the length of the rod. Try this slight bend before trying to lengthen or shorten the tension rod it may save you a difficult repair. Tape the Top-bow to Windscreen rubber to the top of the windscreen.
Top Bow Webbing
The webbing that goes between the top bows is critical for a good fitting top. This webbing spaces the folding top bow and the peak rail in relation to the fixed top bow. It also takes some of the sag out of the center of the top. The soft-top has two seams across it and these seams must line up with the top bows for proper fit. Because of this the length of the webbing is critical to a good fit for your soft-top. If you are having an upholstery shop install your new top have this adjustment made before the top is installed as the old webbing stretches and is probably deteriorated. You can easily do this part yourself by taping the new soft-top into place and installing new webbing to fit the seams of the new top.
Tip: Use a black seat belt, with the ends removed, as replacement webbing. The nylon will not stretch nor will it deteriorate with age and exposure to the weather. It is the same width as the original cloth webbing and the black looks just perfect against a black soft-top. Not original but this works well.
 **
**