The Restoration of PRRROWL
TIGER # B382000221
An Article by John Crawley
March, 2001
Page 20
UPHOLSTERY / INTERIOR
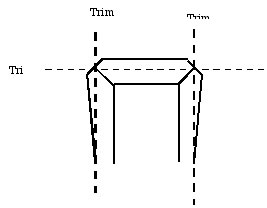
Cockpit Trim (the padded trim that goes around the back of the cockpit area.)
This padded trim is held on with metal clips that are riveted to a piece of cardboard. The outer side of the cardboard has foam rubber over it and is upholstered with vinyl.
The problem here is the use of cardboard in an open car but this was typical of cars that were built in the era of 12,000 miles or 12-month warrantees. Considering that the cars are now 30 years old I suppose the cardboard did well enough.
The clips do tend to pull out of the cardboard though and the cardboard does not hold the shape of the back of the cockpit very well. There is often a gap at the corners between the hood cover and the trim. My solution follows:
- Mark the hood cover and the cockpit trim so that their side-to-side placement can be determined after they are removed from the car.
- Remove the rear cockpit trim and the hood cover.
- Remove cardboard from cockpit trim.
- Remove clips from cardboard by drilling out rivets.
- Buy a piece of 14 gauge aluminum 1 1/2 inches by 6_ ft.
- Pop-rivet the clips to the aluminum using the same spacing as on the cardboard.
- Have an upholstery shop sew the trim's vinyl covering to the hood cover. It should be stitched into place with care as this determines the final location. The stitching should follow the molded seam on the hood cover.
- Check and trim the length of the aluminum strip to make sure that it will be the correct length for your car.
- Attach the combined trim/cover assembly to the aluminum strip using contact cement. Side to side location is critical here.
- This assembly may now be reattached to the car as one piece.
There is now no possibility of a gap between the cover and the trim as they are sewn together. The aluminum strip will hold the rivets securely and may be bent to snugly fit the curve of the cockpit.
TIGER SEATS
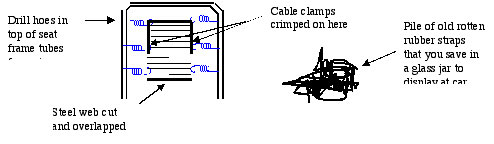
TIGER seats were also a product of the short-term warrantee problem. The seats were never made to last for 30+ years. Most drivers of un-restored TIGERs are sitting on a pile of rotted rubber bands on the floor of the car. The seats of Prowl were no different. I looked at several alternatives and decided that I did not like the original design. The rubber bands were not of sufficient strength to keep my 180 pound suspended in the air and I did not relish the thought of by bottom coming into contact with the floor. Off I went to Pick-your-Part to see if the "bone-yard" would provide a solution to the problem. From past experience I knew that Volvos had the very best seats in the world so this is were I began my search. I found that Volvo 164s had a seat squab that is essentially the same as the TIGER. They are just a little too wide, long and a bit too thick. Most importantly though the pattern of the seat was the same. I bought a pair of seat bottoms along with the springs and steel webbing. Back at the Shop I cut the seat foam as follows.
Volvo Seat Squab Mod
The center of the squab is the same dimensions as that of the TIGER and is made of a very high quality construction. Only the outside edges have to be cut. If you follow the size of the original you will find that it is easy to match. The Volvo rubber is also excellent and in my opinion it is better than that of repro TIGER rubber. Also it is less expensive. The pair of seat squabs from my car cost me $6.00.
If you are not up to this type of surgery you upholsterer will certainly help you out. If you are taking your seats to an upholstery shop that has not done a TIGER before do not take the seat apart first. Let them do this and then give you back the frame for sand blasting, checking that all of the welds and tubes are O.K. and painting. Letting the upholsterer take the covering off of the seat will allow them to study the unique construction of the TIGER seat. This is essential to get a good job.
The next thing that I did was to get rid of the rotted rubber bands and replace them with Volvo springs and steel webbing. Drill small holes in the top of the TIGER seat bottom tubes to correspond with the Volvo spring locations. The Volvo steel webbing will have to be narrowed a bit. This webbing is made of spring steel and will have to be cut with a small grinder. I used the clamps that are designed to hold cables together to join the ends of the webbing. The webbing should be just small enough so that the springs have to be stretched a bit to fit.
The end result is that the seats in my TIGER are as comfortable as a Volvo’s while being visibly not different to those that came from Rootes. The seating position in my car is just a bit higher than normal but it was built for my comfort. You can adjust this by cutting the Volvo seat squab thinner. I have had several TIGER owners ask me how I got the seats to be as comfortable as they are. After I had explained it to one chap I am sure that he did not understand as I later over heard him telling another fellow how my car was not original as it had Volvo seats.
Ya can’t win.
Shifter Boot Location
When I installed the shifter rubber boot I found the small hole in the boot did not line up with the shifter. The hole in the was tunnel is too far to the left by _ inch. This causes the rubber boot on the shifter to wrinkle when the car was in neutral. I fixed this by screwing a piece of metal on to the left hand side of the tunnel and then drilling new holes for the hold down screws and clips that were further to the right. I know this is just a little thing but it looks better.
Shifter Trim Rings & Screws
The repro shifter trim rings are not robust pieces of metal. If you screw the trim ring screws down too hard you will bend or warp the trim ring. If you do not screw them down hard they will come loose. The fix is to install Tinnerman nuts. These are little "U" shaped pieces of tin that have a threaded hole through the legs of the "U". They come in different lengths of legs and so you will have to measure how far the trim ring screw holes are from the edge of the shifter hole in the tunnel and buy the correct Tinnerman nuts. One leg of the "U" goes under the tunnel and the other over it. The trim ring screws will hold in the Tinnerman nuts at any depth without being torqued down tight. A bonus to this is that you can then speak with authority on the use of Tinnerman nuts.
 **
**