The Restoration of PRRROWL
TIGER # B382000221
An Article by John Crawley
March, 2001
Page 18
HEATER & VENT
Vent Box Repair
Back to work on the TIGER . . . I sat on my "thinking stool" for a bit trying to determine what to do next. I decided to hook up the rod that pulls the footwell vent on. You can imagine my dismay when the flap inside the vent box came off in my hand. The hinge for the shut off flap is typical of a 12,000 mile/one year warranty car like the TIGER. The hinge is a very thin neck of plastic, never intended to last for 25 years. After bending enough times it simply tore off. I dare say some of our own body parts aren't what they used to be, and where did I put my own warranty? (8-)
I looked at removing the vent box assembly in order to repair it. It would be a lot of work, as the broken vent was on the driver's side and the steering column would have to be removed and I had just finished installing it along with all the associated wiring. I devised the following fix-it-in-place method. This fix worked so well for me that I have since done the passenger side the same way. A fair amount of manual dexterity and "stand-on-your-head" skill is necessary. Never mind the pain, it's part of the price we pay.
Note: I think that there may be better solutions than what I suggest here, such as pop riveting a new hinge onto the flap and then riveting the hinge on to the vent box. I did this fix in order not to have to remove the vent box from the car.
1. Remove the Vent Opening Control Rod and the windshield de-mister flex pipe, in order to gain access.
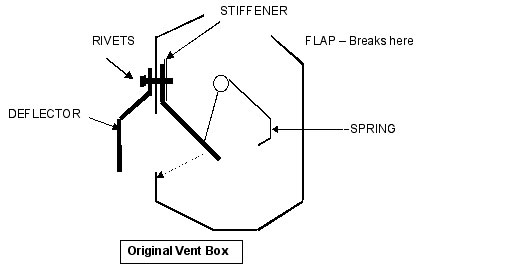
2. With great care not to damage the plastic, drill the heads off of the five rivets that hold the external plastic deflector to the vent box and remove the deflector.
3. Reach inside the vent box and remove the broken flap, the broken plastic hinge piece (discard), the spring and the aluminum, stiffening bracket. Make sure the rubber bush is with the spring. It may have fallen down the vent drain tube, in which case — forget it. Make a new one out of a piece of plastic such as the insulation from around house wiring.
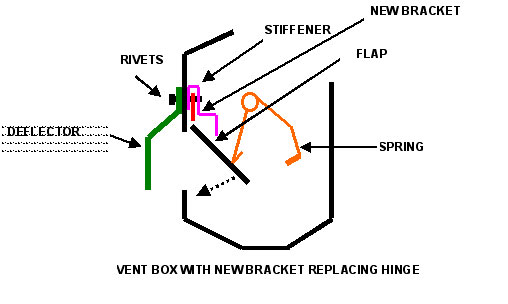
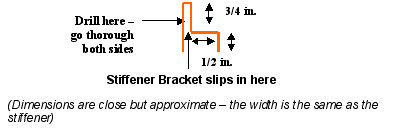
4. Make a new bracket (as shown in the diagram below) from sheet metal. Drill three holes in the new bracket to match the size & placement of the three holes in the stiffener. These holes should go through both sides of the new bracket.
5. Assemble new bracket & stiffener by slipping the stiffener into the slot of the new bracket. The 3 holes should line up.
6. Install this assembly inside the vent box and attach with 3/16-inch pop rivets in the top three holes. You will not be able to attach the external plastic deflector with these rivets as was originally done.
7. The flap and spring may now be placed inside the vent box. The top end of the flap goes under the edge of the new bracket. Put the spring into its original position. This is tough to do when the vent box is left in place on the car but persevere it can be done. The spring will hold the vent flap in place by pushing it up & under the new bracket. The end of the spring that is curved and bent has the rubber bush on it and is the end that goes against the body of the vent. The other end of the spring is bent with no curve and goes into a hole in the bottom of the flap. This end of the spring should be bent a tiny bit so that it will not slip out of the flap after you have assembled it.
8. With 5/16 in. inch pop rivets attach the external plastic deflector into place using the bottom two holes only. Be sure to reach inside the vent box and hold the stiffener so that the pop rivets go through it's bottom legs. These two rivets will hold the deflector in place with no problem but you can seal and attach the top edge of the deflector to the vent box with two sided foam tape, if you wish.
9. Hook up the vent control rod and demister’s flex pipe. This set up should last for at least another 25 years as there is no longer a hinge to wear out.
 **
**