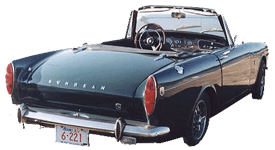
The Restoration of PRRROWL
TIGER # B382000221

An Article by John Crawley
March, 2001
Page 17
"Powered By" Badges
 The replacement "Powered by" badges are not the same quality that the originals were. I spoke to the fellow who used to head the Lucas Plastics/rubber Division in the '60s, about the process of producing the originals and it was very interesting. He was very much involved with this type of product and said that Lucas Plastics supplied many mark badges etc. but could not specifically remember Rootes badges as his involvement was with research and development rather than production. The silver on the back of the badges was electrostaticly coated silver particles – similar to the powder coating of today. The process was very complex and involved high standards of quality control and complex equipment. Most modern replacements use a very coarse paint material to try to duplicate the original "chromed plastic". I believe that this is much more porous than the original and will not stand up to water as well. To prevent the deterioration coat the back with clear silicon before you press it into the holding clips. Excess silicon can be cleaned up if you get it right away. Remember that silicon is not a glue but a water seal. The badge may easily be removed at any time but the silicon forms a gasket. Also do not forget the tip on filling the body holes with silicon as well. Lots of surface rust starts where the paint is thin or is chipped away when exterior trim is installed. Often new paint fills the trim mounting holes to an extent that the holes must be drilled out in order for the trim to be fitted. This can leave raw metal or just primer as a protection. A dab of silicone in the hole before the trim is installed will prevent rust forming in these areas.
Another Editor's Intrusion: Many have experienced the problem of applying paint that will stick to a surface exposed to silicon in the past. Perhaps the sealing coat on the back of the badge should not only have been "cured" before installation, but perhaps a plastic barrier film, made from a lawn/garbage bag, could prevent exposure of painted surfaces?
Tail Light Bezels — Pick & Filing Brass and Aluminum
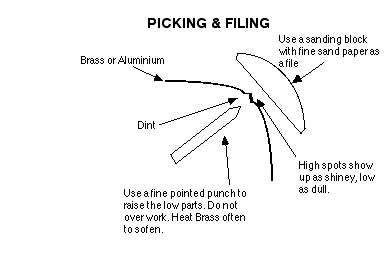
I learned how to pick and file brass the other day. The same principals as working with sheet metal apply to brass and aluminum. They just require a lighter touch and finer tools. The taillight Bezels (or what ever the chrome things are called that hold the red lenses on to the back of the car) are made of brass. One of my TIGER’s was badly dinged. As far as I know they are not available as repros and new old stock is hard to find. I thought that I had little to lose in trying to straighten the bent one. I asked a friend for instructions on how to fix it and he said straighten it till the brass gets hard and then just heat to a dark red with the torch, but not too much or it will melt. Cool slowly or with water and keep on straightening. When roughed in use a fine point to pick out the low spots and a small file to level it just like a fender but use a feather touch. I tried it and it worked. The only additional advice I have is to grind all the chrome off the area to be straightened before you start because it will cause some strange warping when heated. After filing I used emery cloth to polish and then the buffing wheel with polishing compound. After having tried it once I would have no qualms about trying to build or fix anything in thin brass. Use a light punch, with a sharp point, as a pick and keep a feather touch! Use a sanding block with fine sandpaper as a file.
Next I picked, filed and polished the TIGER's custom aluminum rad shroud using the same techniques. It turned out looking like chrome.
TIP: Go to a musical instrument repair place to have this kind of work done if you do not want to try it yourself. They are used to working with thin brass.

 **
**

 The replacement "Powered by" badges are not the same quality that the originals were. I spoke to the fellow who used to head the Lucas Plastics/rubber Division in the '60s, about the process of producing the originals and it was very interesting. He was very much involved with this type of product and said that Lucas Plastics supplied many mark badges etc. but could not specifically remember Rootes badges as his involvement was with research and development rather than production. The silver on the back of the badges was electrostaticly coated silver particles – similar to the powder coating of today. The process was very complex and involved high standards of quality control and complex equipment. Most modern replacements use a very coarse paint material to try to duplicate the original "chromed plastic". I believe that this is much more porous than the original and will not stand up to water as well. To prevent the deterioration coat the back with clear silicon before you press it into the holding clips. Excess silicon can be cleaned up if you get it right away. Remember that silicon is not a glue but a water seal. The badge may easily be removed at any time but the silicon forms a gasket. Also do not forget the tip on filling the body holes with silicon as well. Lots of surface rust starts where the paint is thin or is chipped away when exterior trim is installed. Often new paint fills the trim mounting holes to an extent that the holes must be drilled out in order for the trim to be fitted. This can leave raw metal or just primer as a protection. A dab of silicone in the hole before the trim is installed will prevent rust forming in these areas.