How To Install a Radio in Your Sunbeam
By Tod Brown
Jan. 2002
Page 2
III. Connecting the Wires
Your receiver will come with a big plug with wires exiting from it. This is called the wiring harness and most, if not all, of the connections to your receiver will be made through it. Purchase a few rolls of wire of different colors of the same size as the wires in the harness to make the connections. You can make the connections using crimp-on connectors (get the insulated type), by soldering or by a combination of the two. I usually solder the wires to the harness ends and cover the connections with heat-shrink tubing to insulate them and use insulated crimp-on connectors (which I also solder) at the other end. While you are at it, buy a couple of in-line fuses if the wiring harness doesn't include them. At a minimum, you will need to make the following connections:
1. Switched power – it comes on with the ignition switch. Terminal 4 on the ignition switch is what you want. Usually the red wire in the harness and it should be fused. This will allow you to listen to the receiver whenever the ignition is on.
2. Unswitched power – this will provide power to the receiver so that it can retain stations and other settings in memory and allow the clock to continue to operate when the ignition is off. Terminal 1 on the ignition switch or you can use terminal 2 on the fuse block under the hood (the side opposite the terminal with the brown wires attached). Good idea to fuse this one as well.
3. Illumination – connect this wire to any of the wires to the instrument bulbs.
4. Ground – usually a black wire. This should make good contact with some point on the chassis. One good spot is under one of the bolts holding the heater blower to the body.
5. Speaker wires - A pair of wires for each speaker. These usually come with speakers when you purchase them. Note that they are marked + and – and are often color-coded. The idea here is to get all of the speaker cones moving in the same direction at the same time, so pay attention to the polarity.
Before you make any connections to the harness, run the wires to where they have to go, making sure you have plenty of slack in the wires and that they are routed in such a way that they will not interfere with any other equipment in the car, that they will not be easily damaged during normal usage and that they are unobtrusive, insofar as possible. When all of the connections have been made, push the plug into the back of the receiver, connect the antenna through its connector at the back of the receiver and make sure the receiver switch is off and the volume is turned down. Turn on the ignition switch. Since none of the stations will have been set, you will hope to hear just a hissing noise from the speakers. If that's the case, try tuning in some stations and you should be good to go.
IV. Additional Equipment
Many receivers produced these days allow connections to amplifiers to provide for increased volume for your music. For many of us older types, the newer radios provide enough volume, but for those in the “if it's too loud, you're too old” category, amplifiers certainly can be added to your system. The difficult part is finding room to mount the amps. Since I have not done this, I can only suggest that possible locations might be under the seats, in the boot or, possibly, in the passenger foot well behind the footrest. In addition, it is also possible to add other devices to your system such as a CD changer or MP3 player, etc. If you wish to do so, it would be a good idea, when choosing your receiver, to make sure that it has CD or MP3 changer controls built in. Although universal CD changers are available for use with any FM receiver by “broadcasting” to your receiver, these systems are bulkier, more complicated and have inferior performance when compared to a CD changer that is wired directly to your receiver. Again, finding room is an issue as is security. The best solution, at least in my case, was to mount the CD changer in the boot, bolted to the top of the false floor above the battery. That way, I can easily lift the boot and change the cartridge quickly and can lock the boot when necessary.
As you can see, car audio has come a long way since Alpines and Tigers first appeared with their AM radios. I can still remember one of the first drives I took in my brand new Tiger on a beautiful fall day in October of 1966, top down, radio playing some Buddy Holly and the falling leaves swirling around as I rushed through them. The music was great back then; it's even better now.
"And now for something completely different" - Monty Python
The Editor adds another option.
There are those of us with the Mk I body, and no wish to cut the top cover panels, or who would want only a single set of speakers, or would like to hide them completely form casual observation.
Fortunately, if you can find them, there is a solution. For the "stock look" the radio itself can easily be removed with the screws attaching them to the forward dash support and the rear strap can be removed. If the wire connector is amongst the normal Rootes" refined" under dash routing and layout, similar to a rat's nest. Disconnecting them will not leave observable cables, amongst the chaos. The only issue, then, is where to put the speakers so they may not be easily seen.
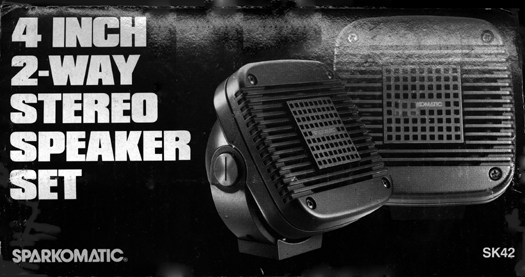
I have used a set of Sparkomatic SK42, 4 inch, 4 ohm "Satellite" 2-way (two speakers, and frequency cross-over divider in each side).

Sparkomatic SK42 speaker set
As can be seen, the speakers are completely enclosed and a swivel mounting hoop is attached to the side. This hoop passes, and slides, through the block shown. It can be slid in the slot to angle the speaker about this mount to about any position you might want. Just as the speaker can rotate around it's side screw-in fittings. This allows a great deal of freedom in orienting the speakers for your needs. The small black block on the hoop is actually the mounting base, and is attached to any solid surface with a single sheet metal screw. The speakers, AND hoop can also be removed easily for show purposes.

Sparkomatic Swivel
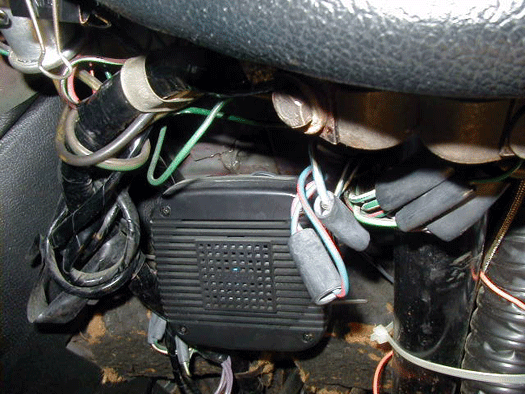
I choose to mount them with the mounting block fastened to the jute covered box beam up under the dash. The center of this box holds your heater. In this position the speakers cannot be seen, even when installed, unless you are a contortionist and wish to insert your body under the dash. As all owners who have tried this are aware, this results in extreme neck joint pain, lower back damage, and is not something you would do again unless you pull the aircraft release pins from the front seat pivots (yes, you should do this and the push-button ball detent type are available at boat stores and aircraft surplus stores in stainless!)

Sparkomatic SK42 speaker set
This picture was taken with the camera on the floor aiming up under the dash. As can be seen, the installation is neater than the original wiring layout. The box beam is directly behind the speaker. Note the authentic cruddy black covered jute on the box beam. The speaker actually makes this site look better than the original. :-)
In the end, they sound great playing my kind of music - classical and The Beach Boys CD with "Fun, Fun, Fun", "California Girl", "Surfin' USA", and my favorite "Little Deuce Coupe" are on my play list. Just goes so well with the Tiger. "The Ride of the Valkyries" is reserved for racing.
These speakers are intended for vans, boats, and pick-up trucks with limited and difficult mounting - just like our Tiger. The Manufacturers Part Number is P7006. The Sparkomatic Corporation was located in Milford, PA 18337. I do not know if this particular importer of the Taiwan speakers is still in business, but the part may have found a new importer, or been copied by another, as it is extremely flexible. Perhaps a boat or van accessories store? Maybe a "swap meet"?
 **
**


