Page 2
I decided to revive my hard top for the drive to the United this year. For long distances, I feel the hard top makes the car much more enjoyable, not to mention the improved visibility as compared to the soft top. I fitted all new rubber, and installed the rear window trim that had NEVER been on the top during my ownership (since 1977). The previous owner had apparently had some problems with this trim, leaving lots of epoxy on the strips and on the old gasket.
I consulted the Tiger Email list, and received numerous opinions, and a complete procedure for installing this trim from Steve Laifman. Being an engineer, of course, I could not leave well enough alone, so I had to improve things a bit, and create solutions to fit my needs.
The ends of my trim strips didn’t really want to stay in their slots. They wanted to pull upward and outward a bit (20+ years of storage in several cellars and garages didn’t help). The clips, if installed the way Steve suggested, would not stay in place. Of course, using Armorall as an assembly lubricant didn’t help. So I would need something to positively retain the clips. I had also heard stories of the trim strips working their way outward, and popping out of the clips.
So here is the procedure that I used to install the trim clips. It differs a bit from what Steve and others had suggested, but I think it does a better job at holding things together.
First, install the gasket onto the window. If using a new gasket, the waxy film on the gasket can be removed with hot, almost boiling water, or Black Magic Tire Wet. Then install the window/gasket assembly into the hard top. Use the "cord in the groove" method as described in the shop manual. I lubricated the gasket with Armorall, but liquid soap has also been suggested. Do not worry about the trim strips at this point.
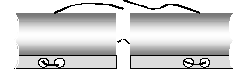
Drill holes in the ends of the trim halves OUTSIDE the area that would be covered by the clips, as shown. Loop monofilament fish line through the holes. I used 20 pound test, but that’s probably overkill. Install the trim pieces into their gasket slots and tie the ends together. The knots should go behind the trim, out of sight, so that they do not effect the trim clip position. I used a bit of RTV to stabilize the knots.
 **
**