"Hiding the Heater Valve"

An Article by Larry Paulick
October, 2002
Preface: Larry Paulick explains his new design for a modern, neat, and available heater valve and installation
Editor
Page 1
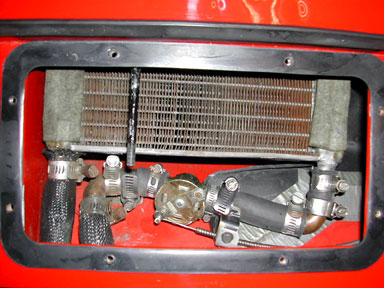
Original Valve
The heater valve on a Tiger is another device that must have been designed by Lucas. It works perfectly, when the car is at rest and the engine is off. On the two Tigers I have owned, the heater valve has given me heat in the summer, and cold air in the winter.
Maybe an exaggeration, but the heater valve is certainly getting harder to find, and I don’t know if the MKI valve is available anymore.
If you want to keep your old set up, I believe you can get a MKIa valve from our two reliable sources, Rick and Curt.
If you want to keep the original MKI valve, you can buy a heater valve, for another British car of the era, like an MGB, and take the guts out of it, and install it in your MKI housing. It is essentially the same valve as other British cars, but with different outlets, and mounting points, than the Tiger.
You will probably have a valve with new internals that works just as good as the original.
New Valve
If you want to add a modern valve, which works, i.e. shuts off the flow of water, is cheap, readily available, and can be hidden in the plenum area of the Tiger, then you have a choose.
The idea of hiding the valve is not new or mine. Tom Hall did an article on this many years ago. I liked the general idea, but wanted to add some changes to clean up the engine compartment, and add a valve at the manifold that can act as a shutoff for the hot water.
The Parts
I used a valve, that I believe is off of a Honda, but is readily available at NAPA. The part # is either 660-1301 @ $16.49 or 660-1402 @ $13.49, as I bough 2 valves to see which fit better. Look at the photos and you will be able to tell which valve is which, when at the store.
I also used 2 copper 90 degree 1/2” diameter elbows from the hardware store, 1/2” and 5/8” hoses, Adel clamps, and an optional shut off valve that fits into the intake manifold. You will have to make 2 hold down brackets for the valve, a hold down bracket on the firewall, but can use the existing flexible control cable, to operate the valve.
You will also use the existing heater control lever, in the dash, but it must be modified, an easy task, after it is out.
Heater Control Lever
- a. Remove the heater control lever from the dash. There are nuts on the backside of the metal plate surrounding that go through the dash and the control lever, that hold the control lever to the backside of the dash.
- b. Remove the flexible control cables from the control levers. Pull the flexible cable going to the old heater valve through the firewall, and set it aside for the time being.
Note – This is a good time to remove and lubricate the flexible cable that goes to the flapper controlling the airflow on the bottom of the plenum. After removing, add some oil to the cable, and let is run down the cable to lubricate the cable and flexible steel cover.
- c. The control lever is operated by a lever that protrudes through the dash that moves a wheel that has a stud, to which the flexible cable is connected. This wheel with stud must be relocated, so the flexible cable does not bind, when it goes through its movement, with the cable in the new location, for the new heater valve.
The wheel is held on the mechanism by rivets, which can be drilled out. Set this aside for now.
Plenum Area
The valve assembly will be located in the plenum area, under the hood release mechanism, next to the heater core. Here is the procedure:
- a. Drain the radiator down about one gallon, so that you can work on the hoses.
- b. Remove the old hoses, and valve.
- c. Remove the cotter pin holding the pull cable or rod for the hood latch, and remove the screws holding the hold latch and plenum cover.
- d. Remove the hoses, clamps, and heater core from the plenum area. This is a good time to clean this area of debris. Save the felt strips on top of the heater core for reuse.
Note – Remember there is still antifreeze in the heater core, so take it out carefully.
Note - This is also a good time to back flush the heater core, inspect for leaks, and if the ends are pushed out, use a vacuum pump, to pull them back in, to the proper shape. Some people have added blocks to the ends of the core, with a long hose clamp to hold the ends in shape, when using a higher pressure radiator cap. If you do, remember the rest of the system must be able to hold the pressure, including the soldered joints on the heater core it self.

- e. Position the heater core loosely in the plenum, and test fit the valve as shown in the photo, to get an idea of where the clamps used to hold the valve will be located. This is a trial fit time, as the space is tight, but everything will fit. Take you time.
- f. Determine where you are going to run the heater hose through a new hole in the firewall, located next to the existing hole on the right side of the firewall.
- g. Using a hole punch, the same size as the original hole, and leaving room for the rubber grommets, punch a new hole through the firewall. You will want to keep this hole as close to the original hole, to miss the air cleaner, shown later. Paint the edge of the raw metal.
- h. There is a large rubber air inlet on the bottom left side of the plenum. Take the flexible cable and slide through, the mating of the rubber with the metal inner firewall. The rubber will seal this area without any problem.
- i. Cut the rear stud off of the heater valve, so that the valve can clear the underside of the plenum cover. The second stud can be trimmed later, as needed, so that there is no interference with the bottom of the plenum cover.
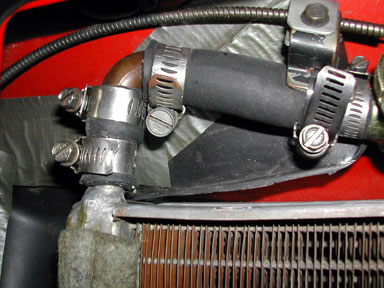
- j. Cut short pieces of hoses to fit to the left side of the heater core, to fit over the 90 elbow, and another short piece from the elbow to the heater valve, then from the heater valve to the next 90 elbow, and then run a long piece through the new hole and past the connection to the front of the engine plus 1’. This will be cut to fit later.
- k. Position hose clamps over the 2-90 degree elbows, and the heater valve, and tighten them so you can still move the hoses. You will have to adjust the clamps and hose lengths, as this is a tight fit.
|
Anyone who would like to contribute to this effort should contact us at Editor E-Mail. Thank you. |
 **
**