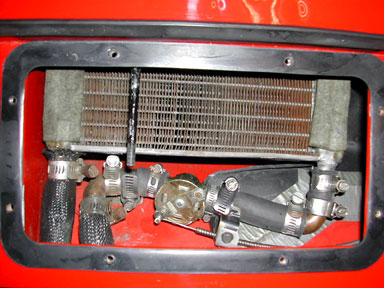
- l. You will now need to fabricate two Z shaped brackets to hold the end of the heater valve. I used aluminum, and used the hose clamps to hold them to the assembly.
Note – The brackets are under the second hose clamps on either side of the heater valve, but are not visible in the photos.
m. Once you have fitted the bracket, so that the heater valve is as far down into the plenum as possible, put the plenum cover on again, and using the flexible cable that was attached to the remaining stud on the heater valve, see if it moves freely. Trial fitting and running it through its full on-off distance will let you know if it is traveling freely throughout its full movement.
n. Since the area in the plenum is tight, take your time in rotating the valve, cutting the remaining stud if it hits the underside of the plenum cover, and once satisfied, mark and drill holes thought the bottom of the plenum floor to attach the brackets to the floor. I tapped the hole and used a machine screw, but you can use sheet metal screw.
o. Tighten the plenum cover on again, and test that it works, without hitting anything, and has full movement of the valve.
Control Valve
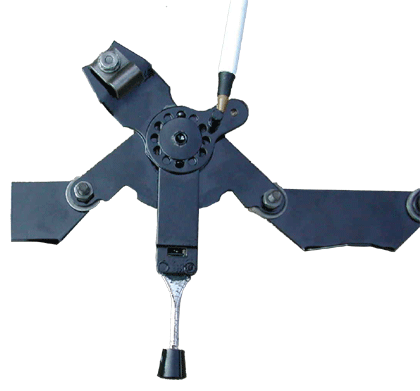
- p. The heater control has a stud to which the flexible line connects. The original location of the stud will not allow the flexible cable to move freely, as the angle is too severe. After you have drill out the rivet holding the wheel with the stud, relocate the wheel so that the stud and cable hold down are in the ideal location to move the heater control lever through its full movement, and not have a sharp turn that will bind the cable.
I found a stud location at about six o’clock, and a hold down at about ten o’clock good, when looking down on the control lever, with 12 o’clock being towards the front of the car. The stud is pointing down, and the control lever will be in the center position.
You can now use a machine screw, and nut to replace the center rivet to secure the wheel in its new location. I used locktight on the nut, to allow for free movement of the wheel. They will not move, as there is a finger on the outside that fits in the holes in the wheel, to position the wheel.
Note – This operation will require that you place the control lever in the dash, cut the excess flexible cable, and cut and adjust to get the cable to its proper length for full movement of the control lever and heater valve. Not hard, but take your time to do it right so the valve has full movement, off and on. You will have to wind a new circle on the end of the wire to fit on the stud.
Measure twice, and cut longer, and check the movement of the lever and heater valve, with the plenum cover off. This flexible cable is very good, and better than I have found in the aftermarket, so take your time, so you can use this cable.
- q. After you are satisfied with the free movement of the control lever and heater valve, install the control lever onto the back of the dash.
- r. Attach a second heater hose to the other outlet of the heater core, and run it through the hole with a new grommet. Use a hole plug to plug up the old hole on the left side of the firewall.
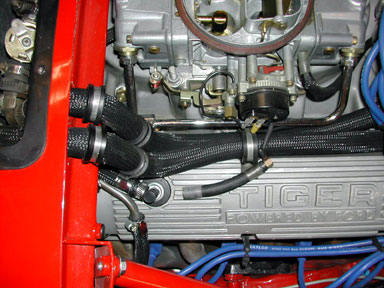
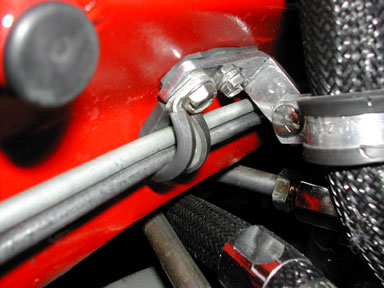
- s. The new heater hoses need to go down after they come out of the firewall, to miss the air cleaner. I used the existing holes with threaded screws, to secure the hoses to the firewall using Adel clamps.
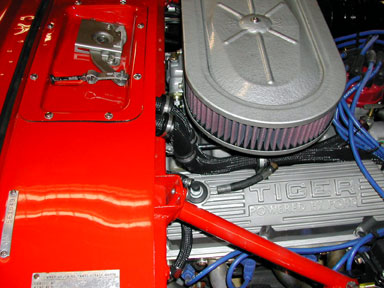
I also used Adel clamps and a new bracket to hold the lower portion of the hoses close to the firewall, again using existing holes and nuts already on the car. There are Adel clamps on the valve cover, to keep the hose in place. This set of Adel clamps holds the hoses in place, but allow movement between the engine and the firewall of the car.
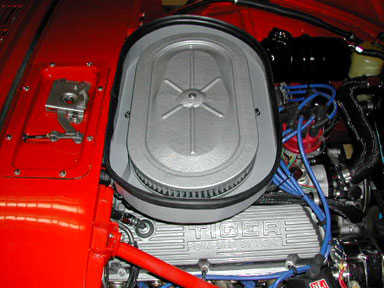
And if you add a cold air box, then this will provide the room needed to miss the interior “can” that makes up part of the cold air system, that mates to the reverse hood scoop, making use of the high pressure area in front of the windshield. One percent power increase for each 10 degree drop in inlet temperature.
- t. Finally cut the hoses to length and connect them to the intake manifold and water pump.
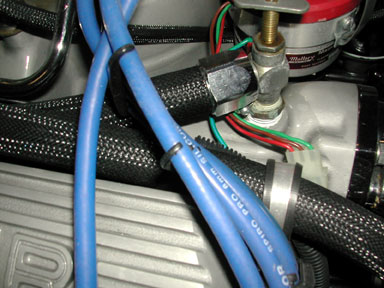
Note – Most 90 degree elbows to the manifold are old, corroded, and really need to be replace. I found a 90-degree elbow with valve at NAPA that screws into the manifold that fits the manifold, and hose. While you don’t need this cut off valve, with the new heater valve, it is cheap, and a nice replacement.
- u. Replace the antifreeze, burp the engine, and test for leaks, after the engine temperature come up. Run the car for a week, and then go back and check and tighten the hose clamps in the plenum area if necessary.
Congratulations, You are Finished. You now have a modern heater valve that works, is cheap, and is replaceable if needed. You have also cleaned up a lot of the clutter in the engine compartment, and I personally think the two heater hoses running parallel on the right side of the engine, look neater.
After one year, the car is warm in the winter, and no hot air or ambient air temperature in the summer, and I don’t use the valve on the 90-degree elbow on the manifold
Larry
