Sand the veneer with very fine sandpaper taking care, as it is very thin. I inquired into the best finish for my application at a local WoodCrafters center. I was looking for a gloss finish that could be built-up with several coats. Most importantly, it needed to be UV tolerant so I wouldn’t be doing this again in a few years. I intend to drive the car often when it’s restored so it will get a fair amount of sun exposure on the dash. I wanted a contemporary finish that would hold up well. I ended-up using EF High Performance by General Finishes of New Berlin, Wi. It is a UV stabilized, high-polyurethane content water based system. This type of finish produced a rather light look to the finished product. Larry Paulick used the same piece of veneer on his dash with an oil-based finish that yielded a much darker look.
Application was with a foam brush and I would lay on about 3 coats and let dry for a day or so. Be sure to finish all sides and the back of the dash with at least 1 coat primarily to seal the dash against moisture which will prevent swelling and warpage.
- Applying the dash lettering
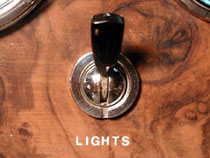
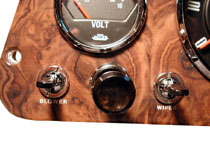
The Tiger dash originally had white lettering silk-screened onto it to identify the headlights, dash lights, and wipers. The blower switch used a tag (ala Alpine) but I think the dash lettering looks much better so I put it on as well. I did however, place it such that the aluminum tag will cover it if I decide to stay with the original look. Luckily, the original placement relative to the switch works well for this scenario. I used a white transfer lettering to reproduce the original look. I had some Chartpak 10 pt. Helvetica medium that I had used in a similar application on my Alpine several years back. Since the font wasn’t quite right, I started looking around for something closer. No one is using this stuff anymore and it’s getting very hard to find. I went to a local art supply store who allowed me to rummage through their stock in the back room. They weren’t stocking it anymore and were selling it for $1.00 a sheet. Unfortunately, there were very few white lettering sheets and the ones I found were the wrong size or font, so I stuck with what I already had.
Use a burnishing tool, pencil, etc. to transfer the lettering down to the dash. Careful measurement and “eyeballing” it will produce nice results. If you don’t like the look of a letter, scrape it off and start over.
I then put down another 15 or so coats of finish to build build-up the thickness and seal in the lettering.
Here are a couple shots of some of the lettering:
 |
 |
After brushing on the finish, it will probably need to be smoothed-out. I did this by wet sanding using 400 grit paper. This is another reason that sealing the sides and back is important. I tried sanding with a vibrating hand sander but found that I had more control by hand sanding. Be careful if you use a powered sander to avoid melting the finish. Also be careful over the lettering so that you don’t go through the finish. After you’re finished, you’ll need to polish it back out. I used Maguires polish and an orbital buffing wheel like you would use on a car. Once again, be careful to not get the finish too hot. When you’re satisfied with the gloss you’re just about finished.
 **
**