The Final Fulcrum Pin Fix!
An Article by John Logan
October , 2001
From the 5/97 Rootes Review with corrections made on 10/14/01.
Page 2
Building the added parts
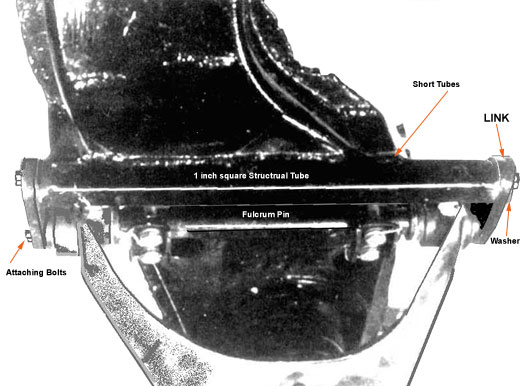
- The main tubes are made from 1" square structural steel tubing with 1/8 " wall and approximately 12 1/2" long. The exact length will be determined at step 3 of the welding sequence. After determining the length, drill four 3/8 " puddle weld holes, in each end of the tubes 1 1/2 " from the ends.
- Use 2" X 1/2 X 20 wheel nuts for the threads in each end of the tubes. Grind two opposite corners of the nuts so that they fit inside the tube and weld a heavy washer squarely on each nut.
Because of a lap joint in the bottom of the crossmember a section of the face of the tube must be removed and fitted to allow the tube to sit flat.
- Two short tubes are made from 1" X 1/8 " wall tubing long enough to run from the main tubes to the welding flange of the crossmember. These pieces are not the same length so measure each of them individually. After they are cut they should be shaped into a trapezoid to match the surface of the crossmember.
- The links are made from 3 3/4" X 1 1/2 " X 1/4" steel bar stock. Drill two 1/2" diameter holes on the centerline, 2 1/4 " apart and radius the ends of the links for appearance sake. If you are drilling these links by hand, mark them so that they can be reassembled in their proper position later.
- Use two 1/2" X 20 grade 5 or 8 bolts long enough to have a shoulder for the links but not long enough to bottom out in the welded nuts.
- Use four 1/2" heavy lock washers on the bolts.
- The nuts shown are the original prevailing torque nuts from the fulcrum pin.
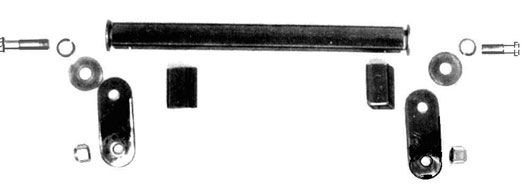
New parts consist of the structural tube, load transfer links, reinforcing tube assemblies, bolts and washers.
Welding Sequence
- Remove the front suspension from the car unless you or your welder are good at welding upside down in tight places. The fulcrum pin and lower arm do not have to be removed.
- With fulcrum pins bolted in their normal position and tightened to 40 ft/lb, remove the nuts and washers from the ends.
The Assembled Parts Prior to Welding
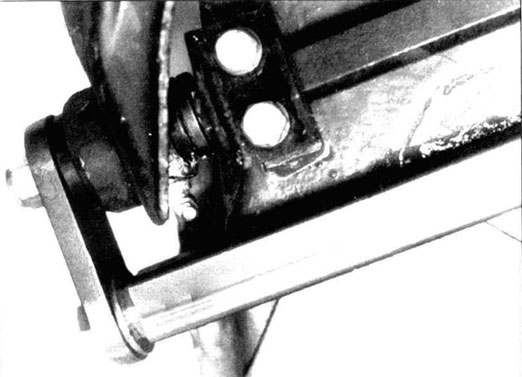
- Assemble the new links, and attaching bolts and washers with the wheel nut and washer weldments inserted into the tubes. The final lengths of the tubes are determined at this point. Allow about 1/4 " gap between the washer and the end of the tube for welding, (see picture 4). The fulcrum pin nuts must be tightened until the links bottom out on the inner sleeve of the suspension rubber bushings. If you are using neoprene bushings, then the links should bottom out on the outer shoulder of the fulcrum pins with clearance for the lower arm to move.
- Center the tubes on the wheel nuts and clamp them to the crossmember.
- Tighten the bolts. The length of the tube assembly is now determined by the links so that you can tack weld the nuts to the tubes on two sides.
- Now remove the tubes and weld the ends, including the puddle welds.
- Reassemble the tubes in their original position and clamp them to the crossmember. The links now serve as a fixture to locate the tubes.
- Tack weld, (TIG or MIG) the long tubes, tack the short tubes to the assembly and finish weld all tube edges to the crossmember.
- Paint and Install the crossmember on your vehicle.
- Tighten The 1/2 " bolts and fulcrum pin nuts to 65 ft./lb. This step is important! In order for the links to transfer the loads to the new tube, the link holes must fit tightly, the links must seat squarely and the bolts must have the proper torque. If you have rubber bushings, the full vehicle load must be on the wheels before tightening, to index them to their neutral position.
Finally
Standard width Ford 260 to 302 front sump oil pans in Tigers will clear the new inboard links by about 1/2". If you have a wide pan, you better check. You may be able to build the tubes with a one inch offset and shorter links at the rear to clear a wider pan but that will depend on the width of your pan. Also, I am not familiar with the clearances required for the Alpine engines.
John Logan -
 |
 |
The End!
|
|
Anyone who would like to contribute to this effort should contact us at Editor E-Mail. Thank you. |
 **
**