"TREMEC 5 Speed Installation"
An Article by Curtis Fisher
May, 2002
Preface: Curtis Fisher has produced another great article on his installation of the TREMEC TR3550 5 speed transmission into his Tiger. This transmission is more robust than the T-5, and interestingly enough the company that produces it now produces not only the T-5 transmission, but the 4 speed Top Loader parts as well. We are sure you will find this article interesting, if not incentivizing.
Editor
Page 1
TREMEC CONVERSION
My conversion started as part of an engine replacement. While the car was going to be down ‘for a few weeks’, why not upgrade that transmission? Thinking of a bolt in transmission with one extra gear, and getting a wider ratio sounded pretty good since I was putting a considerable upgrade into the engine as well. The ‘close’ ratio transmission had always shifted well but seemed less than perfect in auto cross. 1st gear always seemed too tall and 2nd seemed too close, and 4th was way too busy on the road with a 3:31 rear and 13 inch wheels. So there was thoughts of making it all better at once, more engine power, more revs, and more gears… Who would argue with that? Being fairly naïve, I ordered the engine, transmission, and some parts to put it together. If you have read my 5.0 installation "Tiger 5.0 Conversion" you have noticed I engineered a lot of mods for the engine accessories. The TREMEC installation was also an engineered installation. There is no bolt in kit that adapts the TREMEC shape to fit the stock Tiger transmission tunnel.
At the time of ordering, I selected the TR3550, which was strong enough to handle the 320 horsepower and expected torque. It comes with a 0.68 overdrive. It is also available with a 0.80 5th gear. Some will have a strong preference to a performance OD. My thoughts were that dropping from 3,000 r.p.m. to 2400 at 70 m.p.h. was not that important. I wanted a TALL final gear so the engine could loiter at freeway speeds. 4th is still available when you want the extra power. Since my installation, I have been very happy with the final gearing and it still has plenty of pull with the power and weight of the car. The car just purrs in final gear and seems very content.
I had so many repairs I was conducting simultaneously, the entire affair took well over a year. Working at just one improvement would have made it seem so much easier. You tend to loose enthusiasm when it drags on too long. The following are my experiences with the TREMEC installation. As the reader will note, there are many options and choices to be made.
Tom Hall has been of great advice for this installation. When I first mentioned my interest, Tom discussed some approaches which helped steer my choices.
“COMPARISONS”
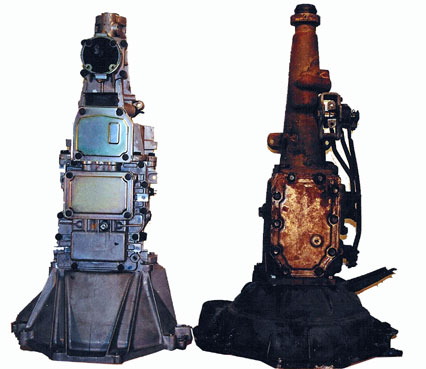
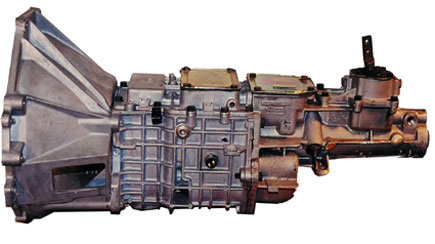
TREMEC and 4 speed Tiger Top loader HEH-E
As most will immediately note, The TREMEC is shorter than the HEH-E. The 4-speed tail is also narrow compared to the TREMEC. There are no external shifting mechanisms on the TREMEC. There are three top location accesses, the shifter can be located in. The weights as shown with housings are 110 lbs. for the TREMEC and 120 lbs for the HEH-E. The flywheel housing is E6ZR-6394-A, it is 7 inches deep. The TREMEC is 24-5/16 inches from the face to the end of the output spline. The 4-speed is 25-5/8 inches. The input splines are 7-3/16 for the TREMEC and 6 _ for the 4-speed.
The TALE of the TAIL
Since the tail area is larger, additional room must be made in the tunnel area. As you can see from the outline of the TREMEC rear shifting tower,
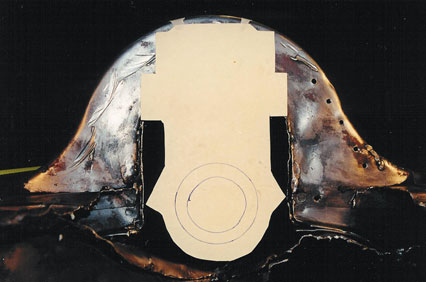
Tunnel Opening
it is significantly bigger than the existing drive shaft tunnel opening (tunnel cover removed). The choice here is to modify the tunnel for room or move the tower forward of the tunnel. As you can see in the Tunnel Opening comparison picture, the bell housing is deeper than the stock unit. If the housing were shorter, this would have a significant movement of the rear tower forward. This would help greatly in locating the rear (less metal to cut to make room). However, the TREMEC input shaft is longer than the top loader and requires the shown bell housing. If the shaft were cut shorter, this would permit a shorter bell housing and result in a better rear location of the tail. In my case, we discussed cutting the input shaft but I did not want to disassemble the new transmission. I had most of the components together and was interested in making it fit into my project. At this point, as I was waffling on the fence, Tom Hall asked if he could fit the transmission into Rob Guerra's "Bomber". I jumped at the chance to see how the experienced person would do this. In a couple days, Tom called me over to see how it could be fitted. I took lots of pictures and decided this would work for me as well. There are choices. Some would not want to cut their tunnel to this extent. If you saw my tunnel and what the PO had done, you would not hesitate to jump in. If you want to keep a pristine Tiger example, you should read not read further.
“SOME ASSEMBLY REQUIRED”
First, the TREMEC structure between the input and output shafts is taller than the top loader and the tunnel must be lifted to clear. I had decided to replace the tunnel with new metal and had a clean slate to work with. You may be able to “lift” the existing metal but it would be hard to connect it to the floor and I don't think you have enough material without splicing. You would have to weld in a cover for the existing shifter hole also. In my case it was preferred to remove and install a new tunnel piece.
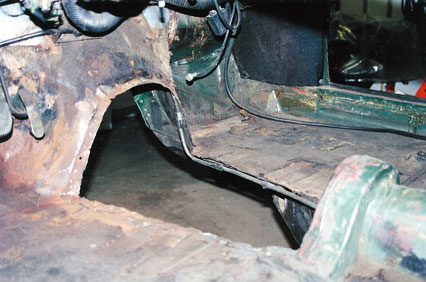
Tunnel Removed
You can see on the removal, the gas line and hydraulic line run just under the floor in this area. The tunnel is stitch welded. You must grind each stitch loose. There are also spot fusion welds on the firewall which can be drilled and then loosened with a chisel. The previous owner had made many intrusions about the firewall and tunnel as I discovered during the project. Some I restored and some I ignored. I still wonder what the PO was thinking. The tunnel was very weakened by the accesses cut into it. The replacement is much stronger adding stiffness to the entire body. Since you are removing a significant structural part, the body should be supported while it is out to prevent permanent deflection. I used a rigid brace between the windscreen mounts and the rear tire well belt attachments. These were installed prior to tunnel removal. The brake hydraulic line is here too. This may be a good time to replace the entire line to eliminate the long term corrosion mentioned in the Tiger-List E-mail News Group. ( See "Tiger Links - Online Resources" for Tiger-List enrollment - Ed.)
The output yoke has to be located in the drive shaft housing to clear the tunnel floor for the drive shaft as shown here. That location
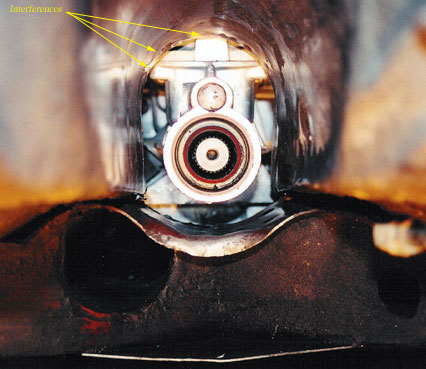
Output Shaft
establishes the location of the tail which drives the overall height of the rear and thus the entire transmission (the input and output locations are defined). Combined with the standard bell housing, the standard input shaft, the rear location is the result. That was my starting point for designing the housing and cutting the tunnel to fit. If you can modify the first two conditions, you could have a better location as a result. You can see in the photo the tower outline is not going to clear the drive shaft tunnel as noted in the previous picture with the outline shown on the front prior to cutting.
 **
**