Front eye bush (eccentric type)
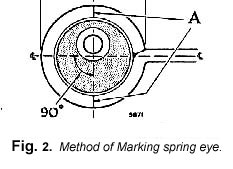
If a new front eye bush is fitted it is imperative that it is pressed in so that the pivot pin location is at the top of the spring eye.
A tolerance of ± 1/32in. (.8mm.) must not be exceeded. To ensure that this is maintained, the spring should be scribed as shown at (A) in Fig. 2 before fitting.
To check rear spring camber
Spring camber is the difference in height between the top of the master leaf and a straight line joining the spring eye centres.
As will be appreciated this varies according to the weight carried in the vehicle.
In order to check the rear spring laden camber
LOAD THE VEHICLE BY PLACING WEIGHTS TO THE VALUE SHOWN IN THE GENERAL DATA SECTION UNDER THE HEADING "REAR SUSPENSION ".
Stretch a length of thread between the spring eye centres and measure the distance between the top of the master leaf and the thread.
Positive camber means that the line of the thread will be ABOVE the main leaf of the spring. Reverse or negative camber means that the line of the thread will be BELOW the main leaf.
For correct spring camber see "General Data" at the beginning of the manual.
For correct spring camber see "General Data" at the beginning of the manual.
|
SHOCK ABSORBERS
Testing
When there is any question of suspension not being adequately damped, the condition of the following should be considered road springs, tyre pressures, bump rubbers, and bump rubber seats, as these carry the full bump load of the suspension.
If a shock absorber does not appear to function satis-factorily an indication of its resistance can be obtained by carrying out the following check
Remove the shock absorber from its mounting. Place the shock absorber vertically in a vice, holding by the lower eye between two pieces of wood
Grip the dirt shield firmly with the hands and prime the shock absorber by working it up and down several times to expel the air..
Move the top half up and down through one complete cycle to check the nature of the movement.
Moderate and even resistance throughout the outward and inward stroke should be felt. If, however, the resistance is slight, erratic or free movement cannot be eliminated by priming, then the shock absorber should be changed.
No amount of hand testing will provide a true indication of the resistance of the shock absorbers at speeds ob-tained on bumpy roads, it will, therefore, be appreciated that a new shock absorber may appear to be weak when operated by hand, but this should not be taken as evidence of fault.
PANHARD ROD
Setting
Fit the Pan hard rod to the brackets on the axle casing and the underframe.
Load the car to the static laden condition as given in "General Data ", and tighten the adjusting nuts on the rod until all the rubbers on the rod are in slight compression.
|
 **
**