|
To refit
Reverse the above instructions, except that when the remote control unit is fitted, slide the unit away from the lock until approximately ~I~’ (.8 mm.) free movement is obtained. A small working clearance is essential for the correct functioning of the lock mechanism.
EXTERIOR DOOR HANDLE
To remove
Remove door trim.
From inside the door casing remove nut at front (under weatherstrip) and screw at rear. Both are fitted with plain and shakeproof washers.
To adjust
On the reverse side of the push-button is a plunger held by a locknut. The correct clearance between the plunger head and the lock contactor should be ~ (.8 mm.) and must be checked when the handle is attached to the door, through the large aperture in the inner door.
When adjusting, simply release the locknut and rotate the plunger bolt in or out as required, finally tightening the locknut.
To refit
Reverse the removal instructions, not forgetting the seating washers between the handle and the door panel.
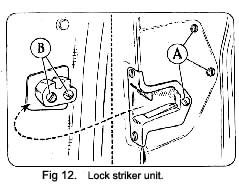
STRIKER UNIT (Fig. 12)
To remove
It is not necessary to disturb this component other than to fit a replacement or to make adjustments. In this case, remove the securing screws (B). Screws (A) retain the lock in the shut face of the door.
To refit
Attach the striker unit loosely to the door pillar, moving to the desired position before finally tightening the securing screws.
When fitted the unit should be at right angles to the door hinges.

|
WINDOW REGULATOR
To remove
Remove interior trim.
Temporarily replace window winding handle and lower window to approximately halfway down and support the glass.
Release the lower ends of the glass run channels.
Remove the screws securing the regulator to the inner door panel. Spring the operating arms from the location in the guide channel (camplate) of the glass and remove regulator from the door.
To refit
Reverse the above procedure.
BONNET
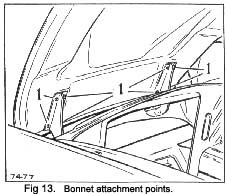
To remove (Fig. 13)
Support the bonnet lid with a suitable sling in the open position.
Remove the four setscrews with their washers from each hinge. (1)
The bonnet lid is now free to be removed. To refit, reverse the above instructions.

BONNET LOCK
To remove
Remove the cotter pin and flat washer retaining the control rod slide and lift off slide.
Take out the three setscrews with their washers and lift off lock.
To remove striker unit (Fig. 14), take out the two set screws (1) with their flat and spring washers.
|
 **
**

