Ultimate Tiger Hub Puller

An Article by Dan Walters
September, 2001
Editor's Note: Dan has contributed numerous articles to this web site. He is well known as a winning racer (above), Previous President of CAT, and well respected Tiger/Alpine mechanic and innovator of such well known performance parts as his axle locator and new Fulcrum Pin stainless replacement with much larger cross-section.
The Final Solution:
.... There are many sad stories about the difficulties of pulling the Tiger rear hub from the tapered connection to the axle. Various tools, techniques, and destroyed parts are in this history.
.... In my evaluation, I had not found an existing method, or tool, to satisfactorily accomplish this difficult task. I did the only thing remaining to me, and had a puller built that WILL do the job, without damage, and relatively without pain. This does NOT mean that a damaged connection, with already rusted to fused hub/axle surfaces, will be easy, or even possible, It does, however, take care of those difficult tasks normally encountered.
.... This unit was custom fabricated, for multiple uses, and the design is simple. The primary use of this tool is hub removal, and it's secondary application is axle removal. Another unique use is for posi-traction breakaway force determination.
Any competent machinist can reproduce it, given the appropriate critical hub/stud dimensions.
- It bolts solidly to the hub to keep the hub from bending.
- It is made from .625 thick cold rolled steel. (1018 or 4130) Hot rolled steel is NOT suitable!
- OD is 5.375 in
- ID is 3.260 in.
- The Bolt circle is 4.25 in. Dia.
- It uses 4 -1/2 in diameter x 6 inch long fine threaded studs to put tension on the axle end. This length is used for long stud (racing) applications and wire wheel Alpine use.
- The other 4 holes are 7/16 dia., and are not threaded. These are used for hub stud attachment.
- The tubes are schedule 80, to make it more rigid, for posi breakaway testing, but NOT used for hub removal!!
- The hex nut is threaded for a slide hammer to pull the axle shaft from the housing with impacts, not a bolt to put a load on the axle threaded end, like other pullers.
- A bolt would only be inserted, and bottomed, in the center thread to protect it if some "persuasion" with a hammer blow is needed to shock the system in a compressive mode. This is not recommended as it can cause axle shaft thread mushrooming, even with a reversed nut.
- Not shown is a Cold Rolled Steel spacer that allows extra clearance for long studs and Alpine wire wheel hubs.
So far I have NOT had to use a hammer with this puller to remove a hub, but if it comes to that I will put a bolt in the hex nut and hit the bolt head.
The center external hex nut is used to hold the puller from turning ( when needed) and to check posi breakaway torque. This new puller is more rigid than my old puller and the old puller has not failed to remove a hub. Also, it could bend the stud ears on the hub of really tough customers. Hence, this new design, excellently manufactured by Dan Westland.

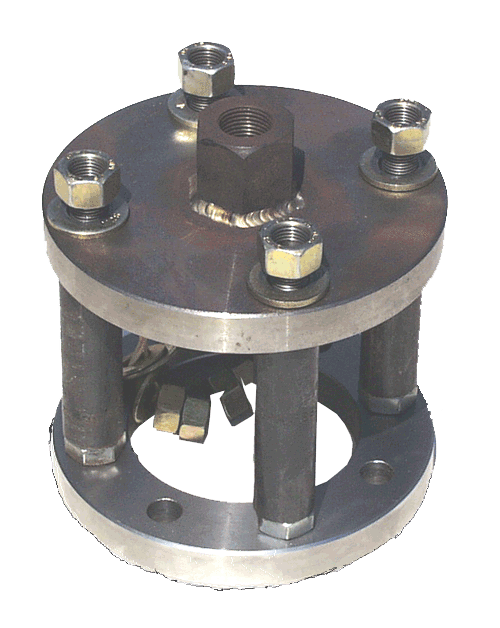
ASSEMBLED VIEW
Note simplicity and sturdiness of design. The lower ring has a dual pattern of stud holes, half of which are threaded. There are also heavy wall tubing spacers shown. These spacers are NOT used for hub removal, but were added for my use in positraction torque testing, and are eliminated, as this removal process only uses tensile forces.
The threaded rods are screwed into the threaded end on the four threaded holes of the bottom (axle) piece and solidly stabilized with the pictured jam nuts.. The top disc has four holes and is held to the threaded rods with hardened washers and nuts. The large welded center nut is connected to a slide hammer when removing the axle shaft from the housing.
USAGE
To remove the hub:
1) Remove split pins and loosen axles shaft nut with road wheel on the ground, If wheels prevent applying a good sized wrench to the nut, use the original steel wheel and tire on to hold the wheel against wrench torque. Reverse axle shaft nut so smooth end is flush with axle shaft end.
2) Remove brake drum per Factory Manual discussion (available on TigersUnited site).
3) Attach inner studded ring to hub with wheel nuts. Torque to 40 ft.-lb.
4) Slide outer plate (with spacer as needed) over ring studs and attach with hardened washers and nuts.
5) Tighten ring stud nuts in crisscross sequence in stages to 40 ft.-lb. Use a wrench to hold center welded nut to prevent hub puller from turning as tightening stud nuts.
6) Repeat step five in 10 ft.-lb. increments until hub releases, or 60 ft.-lb. limit is reached.( I have yet to need more than 50).
7) If torque limit is reached without hub release, take a break and expect release under tension at any time.
8) In the event that the preceding steps do not release the hub, additional persuasion may be required, such as a mild tap with a hammer [on the inserted central bolt bottomed on the welded hex nut]. Use good judgement on the amount of force used to hit this fixture to limit damage to the axle threads, or internal axle components.
Axle shaft removal entails the use of a slide hammer on the welded nut after the hub is loosened and the axle shaft retaining bolts are removed.

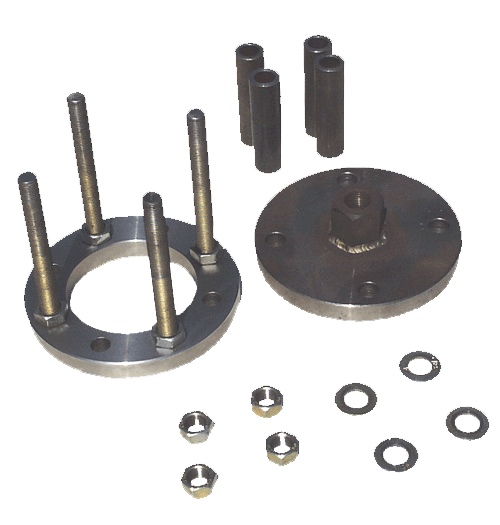
DISASSEMBLED UNIT
Another view, disassembled, to show the high strength threaded rods, and the relatively heavy gauge tubing.
Dan Walters
 **
**


