Sound Advice
or
"How to Have Excellent Audio With Original Appearance"
By
Shaun Laughy
Feb. 2003
Page 4:
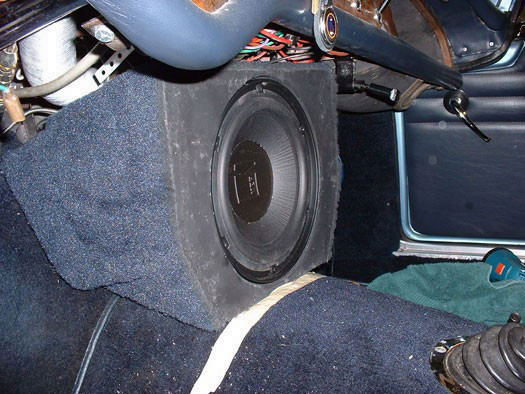
Finally, the big challenge: Installing the subwoofer and creating an appropriate, period-correct fascia. After all, this thing is huge (relatively) and is also pretty heavy. Bruce spent many hours designing, building and installing a custom enclosure that would both fit under the dash and provide the interior volume necessary to allow the speaker to operate properly.
We decided that a separate box would be built for the speaker, which would be covered in carpet matching the floor. Fortunately, I had a rare stroke of genius (trust me, these are really rare), and suggested that we build an enclosure that looked like the LAT-option Motorola radio and speaker unit, but that would contain the subwoofer instead of the original components. This was quickly agreed-upon as the best course of action and plans were made to proceed. Needless to say, we were both getting pretty excited by the project by this point!
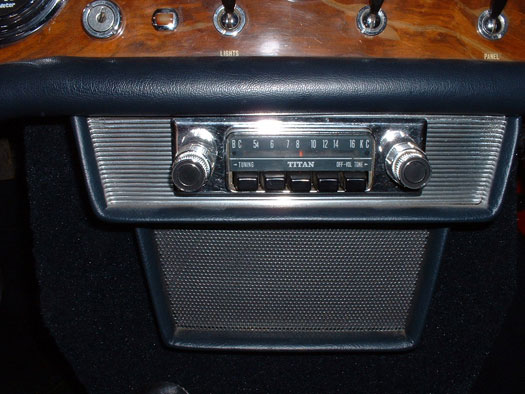
Upon further investigation, it became obvious that there was no way that the 8" Subwoofer would fit inside an enclosure that matched the size of the original LAT-72 radio box. So, after much thought, it was decided that a fascia looking (somewhat) like the original radio would be placed in front of the subwoofer. The result is, in my opinion, very effective in giving an original appearance while still allowing excellent audio performance. So far, no one who is unfamiliar with Tigers is even aware that the subwoofer is present, and most who do know Tigers have not noticed when casually looking at the car.

Subwoofer on transmission tunnel, mounted in ugly carpeted box

With just a little bit of imagination, the subwoofer is now hiding, somewhere!
Special mention has to be made of the fascia that Bruce made for the project. I know that he spent many hours on this part of the project as he literally hand-built the components out of wood and fiberglass, making sure to get things just right. Keep in mind that he didn’t have an original housing to work with, so he had to estimate dimensions, colors and materials strictly from the black and white laser-printed photos that I provided. The speaker grill area was cut to fit from a standard round grill and was painted gray to match the look of the original.
The real challenge was in finding a suitable material to duplicate the ribbed, extruded-aluminum that surrounds the original radio face-plate. After an incredible amount of work crawling through auto-wreckers and scrap metal dealers, Bruce struck it lucky and found the perfect solution at the local home-improvement store (Revy). Believe it or not, what you see here is a piece of industrial aluminum base molding (used at the bottom of walls next to the carpet or other flooring). It was kind of funny to find such a perfect solution at the home-improvement store across the street, but who wants to look a gift-horse in the mouth? Comparing the unit side-by-side with a photo of an original, it is possible to see differences, but I am absolutely satisfied with the appearance, and was very happy with how this turned out overall.
By the way, I know that the radio isn’t an original type, but I just couldn’t bring myself to cut up an original Tiger radio (remember this is only a fascia which has no depth). As a compromise, I located a period-correct AM radio of the type that was used on most imports at the time. Bruce attacked this unit with a metal band saw and all that remains is about the first 1.5” of the radio. This gives the appearance of an AM radio while maximizing the room behind for the subwoofer.
 **
**

