Clearance for Valve Covers

An Article by Tim Ronak
January, 2002
Page 6
How to Build Clearance to Easily Remove the Aluminum Valve Covers (cont.)
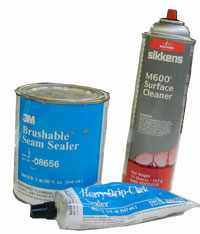
After re-masking the entire engine bay i washed it with Sikkens M-600 Wax and Grease remover. It is really convenient as it comes in an aerosol can and was really easy to apply. I sprayed each section in an area about 2 feet by 2 feet and then I thouroughly dried each section before i moved on with a clean cloth rag.
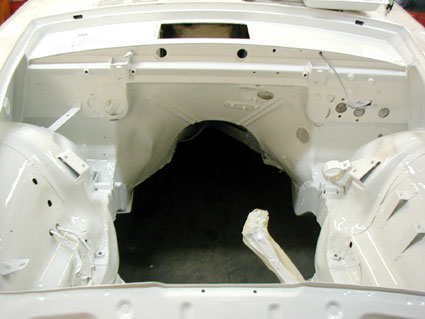
I primed the engine bay right over the degreased, blown and tacked blasted steel with Sikkens Epoxy Primer LV which is an unbelievably adhesive and durable product. If you try this besure to use an approved respirator or fresh air system. As it flashed off I was amazed at how it filled the rough blasted surface. As I did not want to sand the engine bay before I applied paint I had a limited window to work in. The product specifications indicate that it can be painted over "wet on wet" (no sanding) if you perform the operation and get a topcoat of paint on it within 7 hours.

Figure 14
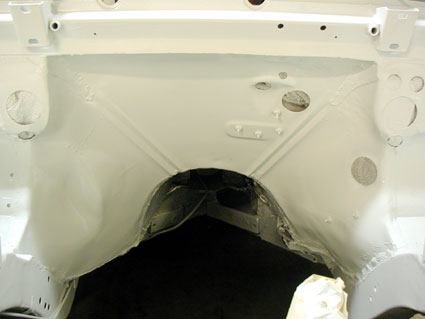
This permitted me to allow it to dry for 2 hours before I applied all of my 3-M heavy drip check sealer on the seams around the firewall insert as well as applying 3-M brushable seam sealer along the lower insert areas where the large gaps used to have thick applications of body caulking. Use caution when applying the Brushable Seam sealer on a fresh surface as the acetone in it is very strong and it may soften the surface a little after it sits on it for a time. It is only an issue if you try to re-spread the sealer after a few minutes. Once done I allowed the seam sealers to dry for about 3 hours and then applied 2 coats of Sikkens Autocryl white to the engine bay with about 10 minutes between each coat. The sytem I used was our "Production" one with the Standard hardener and the Production activator. It was tack free in 5 minutes and dry to touch in 15 minutes. I could not believe how fast it set up. I have not painted for a while and the two small runs I created on the inner tunnel will be a future testament to that but I was truly in awe at how fast this product dried and still stayed smooth and glossy.

Figure 15

Figure 16
I allowed it to dry overnight and then unmasked the car. Three weeks later I was amazed at how well the gloss was as I really expected the products to "sink" into the sandblasted surface but apparently Sikkens Epoxy primer is designed for exactly what I used it for on commercial equipment and bodies. It surpased my highest expectations.
I hope you will find the information presented here helpful to you in your projects.
Tim Ronak
Office E-Mail
Home E-Mail
Addendum: Who IS Tim Ronak? The Author's Autobiography
"I grew up in the Auto body industry at 12 years old pushing a broom in my Dad's shop in Canada. I started rebuilding everything from pedal cars to my 10-speed. Early on I decided that I would rather do work myself rather than let others, as I was just too picky for most people. I worked in my Fathers shop as a collision repair technician for several years and at this time built a Pro Street 1959 English Ford Zephyr Convertible that ultimately had a 406 Chevy engine with 2 nitrous systems that ran low 10's (Best 10:30 ET the one time at the track) through the mufflers back in the early 80's when low 10's was fast (Roughly 700 HP).
Did most of my work out of my home garage, as my Dad did not like it at his shop. If I didn’t know how to do something I taught myself. Worked and built so many cars it is not feasible to list but here are some notables. Restoration work / touchups on AC Cobra 289, 1955 Mercedes Gullwing 300SL, Morgans, Lagondas and the odd Maserati and Lamborghini. Completed major fabrication and drive train work on several early Chevelles, Corvettes, Shelbys, Mustangs and Camaros. First guy in town to have a tubbed car that he built himself.
Cleaned up on the local street racing scene and was even featured in the local Herald as one of the "Bad Boys". Then started fabricating Race Cars from the ground up at night. Lost my shorts and decided to go to university to learn about business. I continued working with cars through school and built a GT1 Camaro and raced with Theo Smit, in Calgary Canada. That car achieved 620 HP out of 350 Cubic inches naturally aspirated and won the "Most Awesome Sounding Car" award one year from our Sports Car Club. We were very successful until the guys showed up with the tube chassis cars.
Put myself through university building electronic fuel injection harnesses for hot rods after doing one for myself for an '84 S-10 that received a 350 TPI and a 4-speed automatic, that was a BLAST to drive. Dropped off the face of the "car guy" earth for a while and got back into cars after considerable research over what to buy and then purchased my Tiger in Calgary from the third owner in Calgary as a fairly original Canadian Tiger.
Personal Past projects: 1959 English Ford Zephyr Convertible 406 Chevy with Tubbed Diff and 2 nitrous systems ran mid to low 10's in early 80's through the mufflers. 1984 S-10 350 TPI conversion, most fun vehicle ran high 12.0's and achieved 28 miles to the gallon. GT-1 Camaro with my Brother-in-law that was a Modified Players challenge car with a 620 HP 350 CI naturally aspirated. I never drove it, as my Brother-in-law was the driver, I just built it and went to the track on race day. Now I own a 66 MK1-A Tiger B382000680 that is getting a new engine."
Tim
We have continued this series of articles describing WHY the firewall needed this surgery.
Read the "Next Chapter"
 **
**


