Tiger 5.0 Conversion

An Article by Curtis Fisher
Sept., 2001
Page 2
Pulleys, Pumps and the "Tale of the Tape":
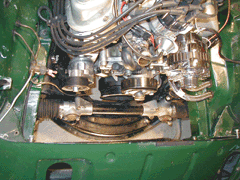
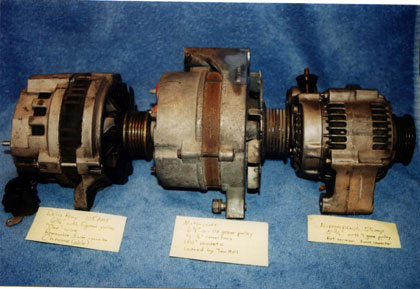
I really wanted to keep the serpentine damper pulley, thinking I only needed to add a ribbed pulley to the waterpump and locate the alternator similar to the previous generator (I thought). However, the waterpump is reverse rotation and should be driven off the back side of the belt. I looked at various ways to fit pulleys to make a serpentine wind around the damper, waterpump and new alternator. After many sketches of possibilities, it came to two choices. Passenger side alternator or driver side alternator. This is with one tensioner pulley. With two or more, there will be other options. I measured and remeasured and measured some more. There is 5.25 inches from the block to the front of the damper pulley, a primary reference point. The passenger side head is more forward than the driver’s side by one inch. This gives one more inch on the driver’s side for an alternator to line up with the damper pulley. I searched high and low at junkyards, auto stores, websites, but my best luck was an electric rebuilding shop that loaned me many cores. Tom Hall provided a Ford alternator and bracket which added valuable test and alignment fixturing. After looking at and measuring hundreds of models, it came down to a Delco Remy 105 amp (7861-11) alternator. It had the shortest length (the most critical dimension) and the right attach points to design a head mounted fixture.

There were smaller alternators (Toyota, Nipondenso) but these are not shorter in overall length. Also to be considered is the "clocking" or how the mounts of the alternator are presented. After narrowing the choice to what could fit, it was further refined by how it could be mounted. For my application, the driver side worked better. My custom alternator mount bolts to the head and provides the pivot to the alternator. I have seen the alternator mounted low on the passenger side that could be an option. Looking how to mount a tensioner to ‘wrap’ the belt around the waterpump and get to that location did not seem to fit the crate motor package. With the alternator selected, the tensioner presented a quandary. Most tensioners and mounting brackets are custom for the car and model. I looked at many Ford brackets, including the one loaned from Tom Hall. Most are multi-use, designed to mount the tensioner, alternator, condensor and other accessories. I needed a simple tensioner mount, and the passenger head looked like the best place.
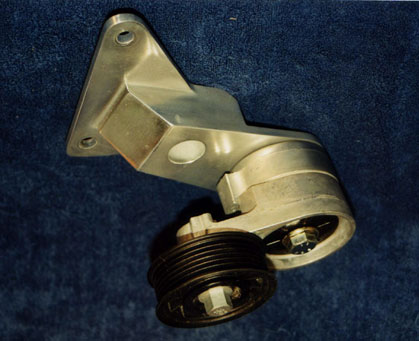
After numerous visits to auto parts stores, and forever hearing "what year car is it?" while the junior clerk looked at the computer screen. I found a model at Kragen that looked exactly like what I needed. It had a simple mount and index key to set the tension for my belt. With the parts in hand, mounting was addressed. The alternator bracket was fabbed in wood, a trial bracket was made (and run) before a final mount was made. There are many choices on brackets, this is my attempt. It has worked well so far. I tried various locations with fixtures, but kept coming back to the driver side. The alternator length was the driving factor.

The tensioner bracket was designed concurrently to position the belt low and be out of the way. In retrospect, a slightly higher location (1 inch) would have been preferred. It was modeled in steel pieces, test run and milled in final billet aluminum. I learned my first aluminum polishing on this piece. A 50 inch 5 rib serpentine belt fit this perfectly.
 **
**


