The Journey begins (one step at a time)
The day after I got home I started the car up and took it on a loop of my 8 home cul-de-sac at 5 mph just to say, "yea, I've driven it." I also had to deal with the now previous owner letting a rat roost in the car. She and her 4 babies made their home in the trunk under the driver's side gas tank and it STANK!!! I do not know what killed "Stinky" (as we called her), but when I tried to remove the deflated leather like body she was so stiff that even pulling with pliers she would not bend and eventually I had to remove the tank. I jacked the car on one side to transfer the gas, but when I pulled the hose free a significant amount of fuel still spilled onto the garage floor. As I scrambled to stop the (rapidly) leaking gas I knocked over the open bulb light that was illuminating the area!!! Well, that potentially might have gotten rid of the smell!!! 12 hours with my Tiger, I nearly torched it and took the garage too! Later that night my wife was in the garage and said something is leaking all over the floor. Though this time it was not gas, there was a large puddle of brake fluid weeping from the passenger rear. Now even the 5 mph run earlier that morning seemed a potential disaster, especially considering the handbrake incident that Smitty had the day before.
I cautiously let the car sit while I better surveyed the condition and formed a plan of attack. I never had plans to just start driving it, I knew this was a project of considerable duration. The fact that it was the rainy season for Calif. and the cool (read that cold to a Californian) weather didn't help progress either. I knew with my minuscule budget that I would never have a great looking Tiger, but by God it was going to be my goal to have it acceptable for the least amount of money possible.
 I decide to take advice I heard Norm Miller give someone on the Tiger list. That advice was not to take the car completely apart, but to work on it in stages. Thus, my plan was to deal with the floor pan, back to front and underside to topside. Eventually I embarked on removing ALL the undercoat and paint.
My neighbors were probably hoping for the rolling blackouts that Calif. was experiencing to silence my constantly whirling angle grinder with rotary brush attachment. It was tens of nasty hours getting burned, breathing who knows what, and dropping the running grinder on myself and watching it race up my clothing towards my face.
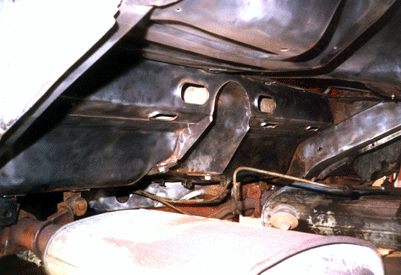
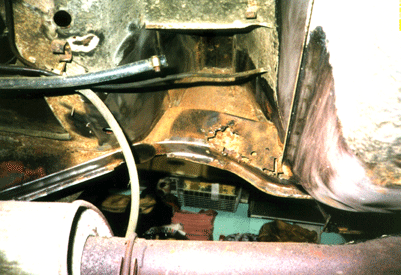 I had opted to use POR-15 paint and that required bare metal. Eventually, I divide the car into three areas, rear of the car to the X member center, the X member center to the firewall and the firewall to the front and would work those each as an area. The now missing panhard rod had pulled out and I had to repair that and other areas of the frame before painting. I got a 100 amp Lincoln gas MIG welder for $250 as a close out at Costco (Eastwood wanted $425 for the same thing). I had welding in High School 25 years ago, but let's just say there is a "curve" you have to re-learn. I did a LOT of grinding to make things look acceptable.